
Tired of unsightly carpet wrinkles and bumps that make your floor look worn and unprofessional? Carpet stretching is a critical maintenance technique that can breathe new life into your flooring, improve its appearance, and extend its lifespan.
Whether you’re a DIY enthusiast or considering professional help, this comprehensive guide will walk you through everything you need to know about stretching carpet flooring effectively.
Understanding Carpet Stretching
Carpet stretching is the process of tightening and adjusting carpets to eliminate wrinkles, ripples, and uneven surfaces. This technique involves pulling the carpet taut and re-securing it to the floor, ensuring proper alignment and tension correction. It’s an essential part of flooring maintenance that improves both the look and safety of your home.
Carpet stretching techniques are vital for maintaining the longevity of your flooring. With time, carpets often loosen due to heavy foot traffic, improper carpet installation, or natural aging. By restoring the tension, stretching prevents premature wear and reduces the risk of tripping on folds or wrinkles.
Moreover, professional carpet care during this process helps restore the original aesthetics of your flooring, saving you from costly replacements down the road.
When and Why Carpets Need Stretching
Carpet stretching is typically needed after a few years of use, especially in high-traffic areas. Stretching becomes essential due to factors like:
- Poor initial installation.
- Heavy furniture dragging across the floor.
- Flooring renovations that disrupt carpet alignment.
Investing in professional carpet repair ensures the job is done correctly, maintaining the integrity of your flooring system.
Signs Your Carpet Needs Professional Stretching
Wondering if it’s time for carpet tension correction? Look out for these telltale signs:
- Visible ripples or wrinkles across the surface.
- Loose edges or corners that no longer hug the floor snugly.
- Difficulty placing furniture evenly because of uneven flooring.
- Increased wear and tear in specific areas due to improper tension.
Ignoring these signs can lead to more significant floor renovation costs in the future. For lasting results, consider consulting experts in professional carpet care services.
Related Read: Carpet Padding Types: Choose the Right Foundation for Your Floors
Tools and Preparation
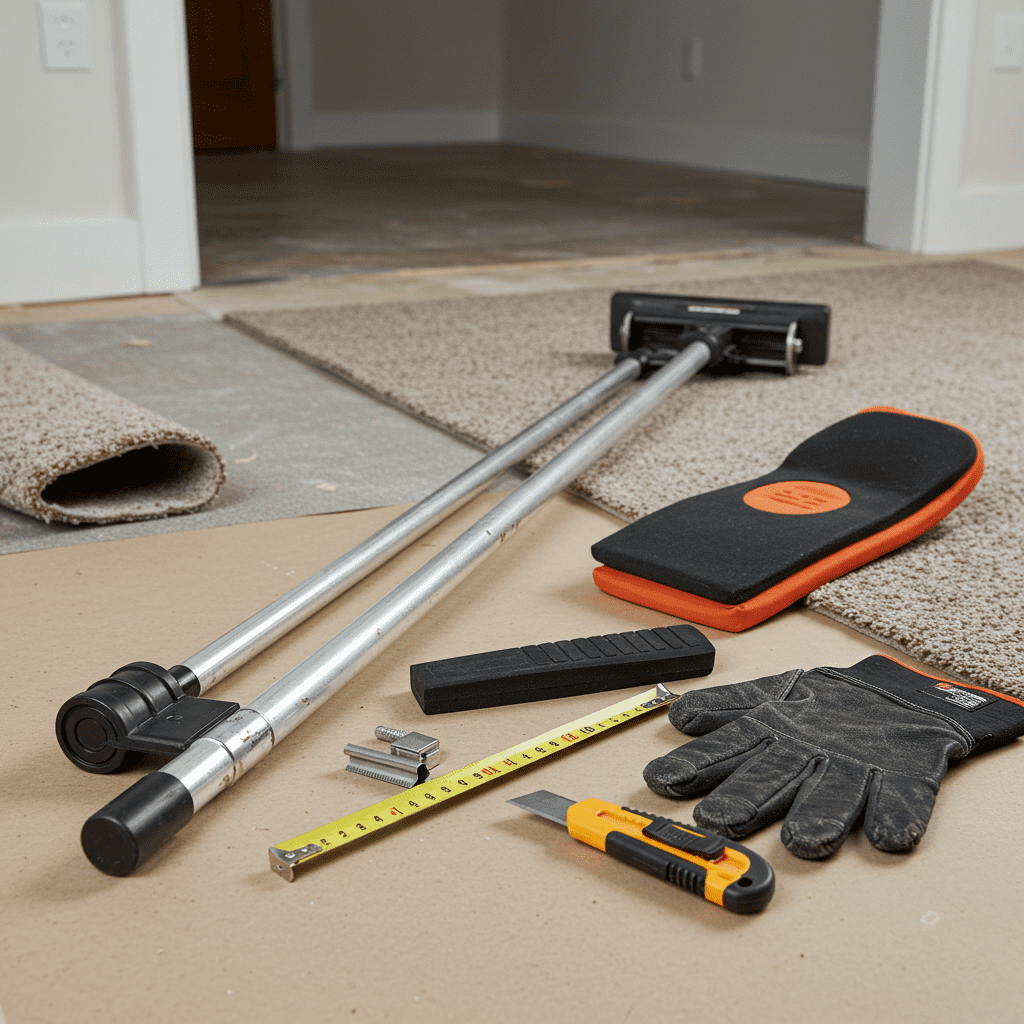
Proper carpet stretching requires the right set of tools to ensure precision and effectiveness. Whether you’re handling minor adjustments or tackling a large-scale flooring renovation, these tools are indispensable for successful results:
Carpet Stretcher: The cornerstone of any stretching project, this tool uses tension to pull the carpet tightly into place. It’s ideal for large areas, ensuring proper wrinkle removal and even spacing across the surface.
Knee Kicker: A smaller, handheld tool used for adjustments in tight spaces. It helps secure carpet edges and corners where a full carpet stretcher might be impractical.
Utility Knife: Used to trim excess material during the carpet installation or stretching process. Sharp blades allow for clean cuts, ensuring a polished and seamless finish.
Measuring Tape: Precision is key in any flooring maintenance task. A measuring tape helps ensure exact measurements and prevents over-stretching or uneven finishes.
Protective Gloves: Since most tools used in carpet stretching involve significant pulling, stretching, and cutting, gloves are essential for protecting your hands and ensuring a firm grip on equipment.
Why Proper Preparation Matters
Using the correct tools ensures that carpet tension correction is done effectively, reducing the likelihood of damage to your flooring. Professional carpet care services typically rely on these tools, highlighting their importance in achieving clean, long-lasting results.
Pro Tip: If you’re tackling a DIY job, it’s worth considering renting high-quality tools to avoid compromising on results. However, for extensive repairs or stretching, calling in expert carpet repair services is always recommended.
Pre-Stretching Preparation
Proper preparation is key to ensuring a smooth and efficient carpet stretching process. Taking the time to set up correctly prevents delays, minimizes errors, and guarantees professional-quality results. Here’s what you need to do before starting:
Clearing the Room
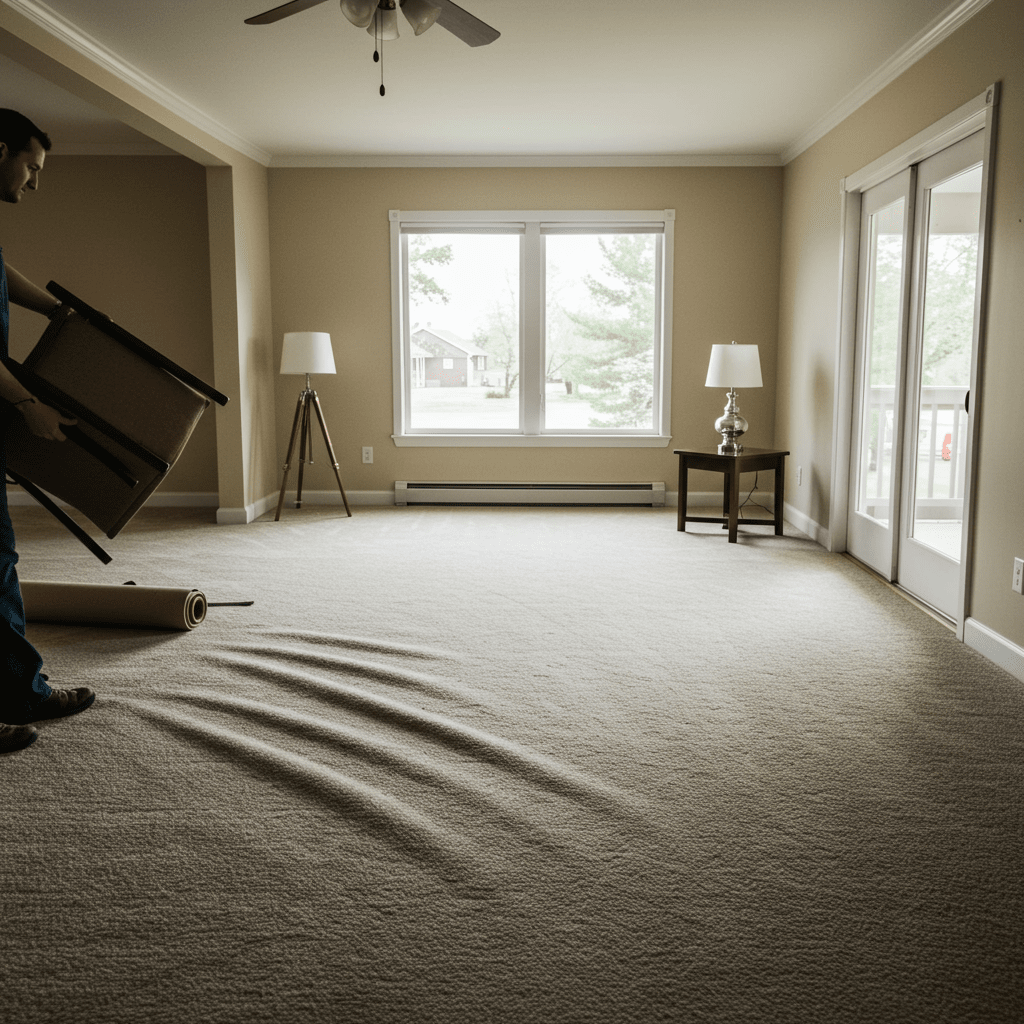
Begin by completely clearing the room of furniture and other items. Removing weight from the carpet allows for easier adjustment and ensures even tension during the stretching process. Heavy furniture left in place can cause ripples or uneven sections. Clearing the room also prevents accidental damage to belongings during the process.
Pro Tip: Use furniture sliders for effortless movement and to avoid scratches on hard flooring during the process.
Inspecting Carpet Condition

Take a close look at the current state of your carpet. Check for:
- Wrinkles or Ripples: Note areas that require specific attention.
- Loose Seams: Inspect seams to ensure they haven’t separated over time.
- Damage or Tears: Address these issues through carpet repair before proceeding, as stretching a damaged carpet can worsen the problem.
Understanding the carpet’s overall condition can help decide whether routine stretching methods will suffice or if professional carpet care is needed.
Identifying Potential Challenges
During inspection, identify obstacles that might complicate stretch correction:
- Wall obstructions: Odd corners, door frames, or tight spaces may require additional adjustments.
- Improper Carpet Installation: Carpets that were not originally installed with proper techniques may require extra stretching or reinstallation.
- Underlying Flooring Issues: Uneven floors or subfloor damage may need attention for uniform stretching results.
Taking the time to assess these factors ensures a smoother process and avoids surprises mid-task.
Related Read: Will Vacuuming Get Rid of Carpet Beetles?
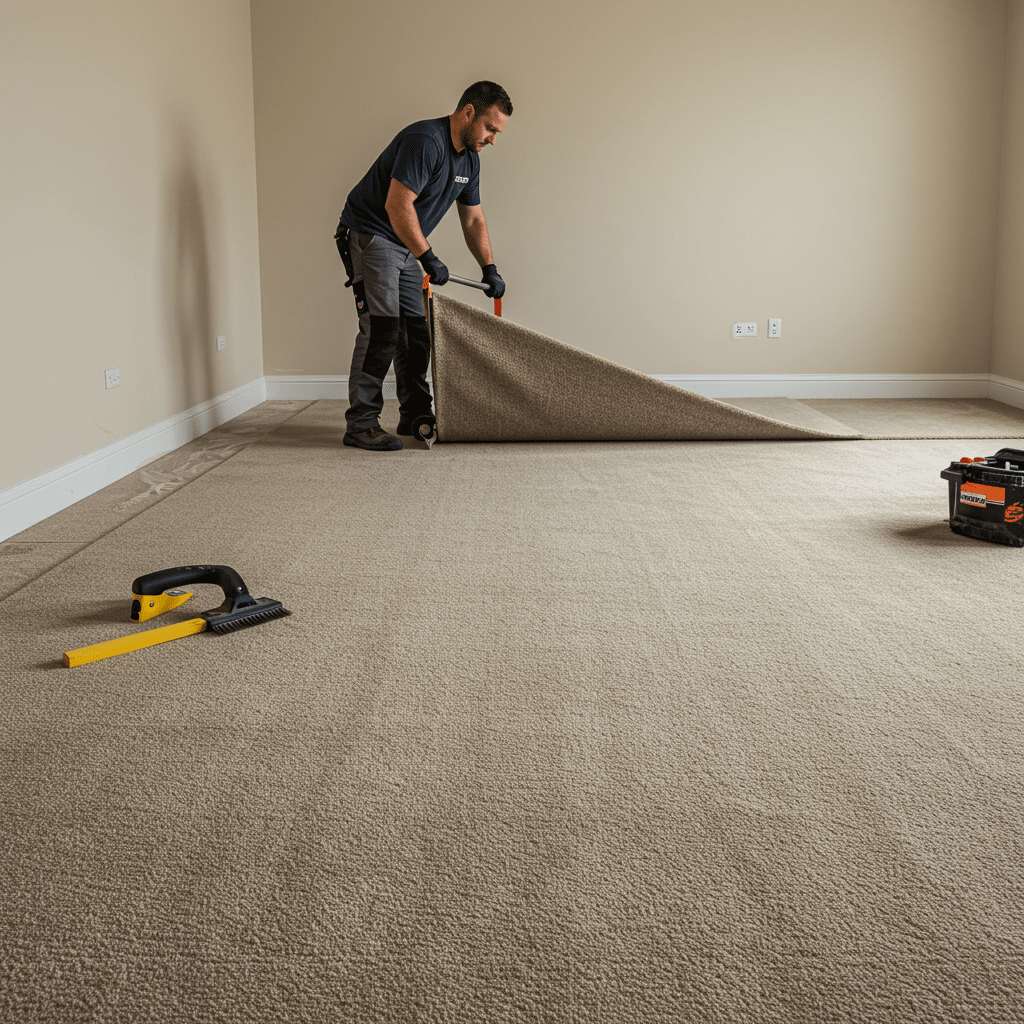
Step-by-Step Carpet Stretching Process
1. Removing Baseboards
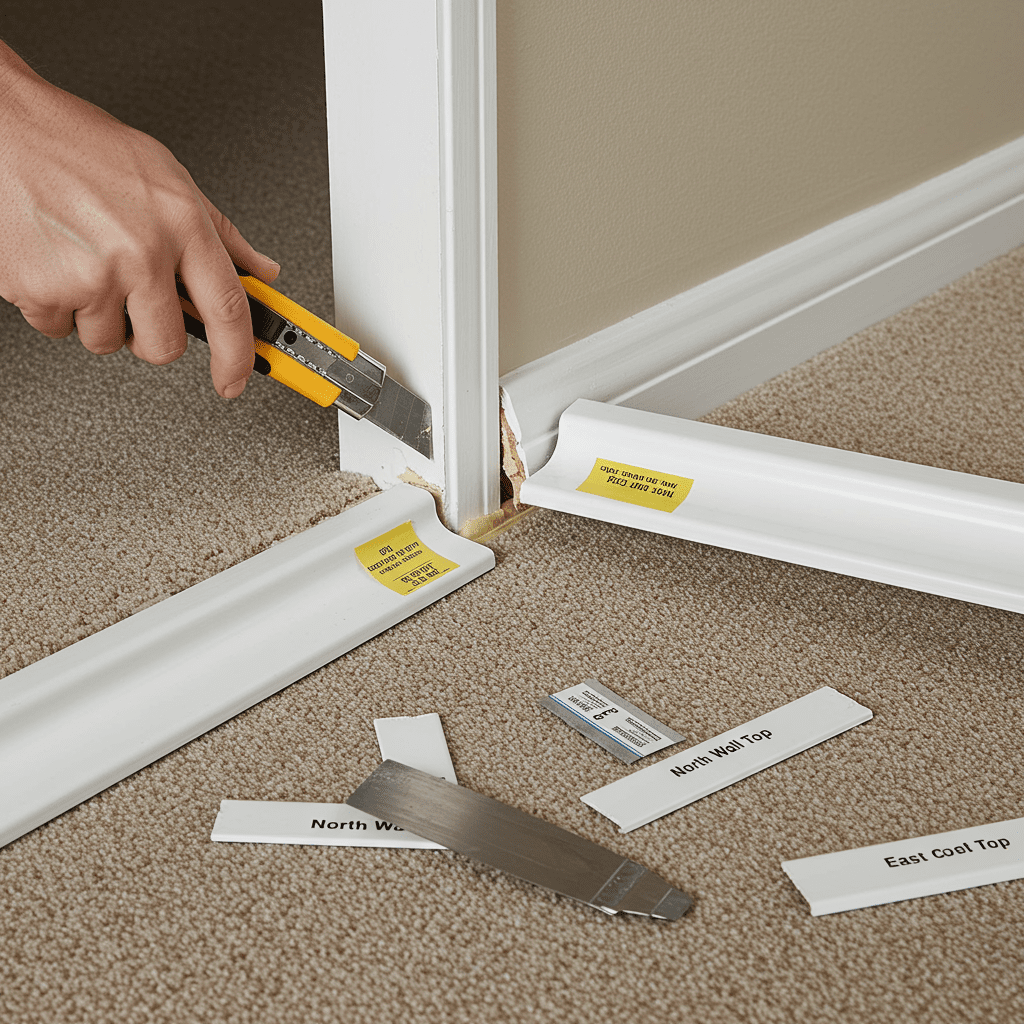
The first step in stretching carpets is to carefully remove the baseboards, allowing easy access to the edges of the carpet. Baseboards need to be handled delicately to avoid unnecessary damage to the walls or trim. Here’s how to do it right:
Careful Removal Techniques
Loosen the Baseboards Gently: Start by running a utility knife along the seam where the baseboard meets the wall to cut through any caulk or paint. This prevents peeling or chipping during removal.
Pry Gradually: Use a flat pry bar or putty knife to gently lift the baseboard away from the wall. Work along the length of the baseboard to remove it evenly instead of tugging at one spot, which can cause cracking.
Label Each Piece: As you remove baseboards, label them (e.g., “North Wall Top”) to ensure a smooth reinstallation process after the carpet stretching is complete.
Tools Required
Here are the essential tools you’ll need for removing baseboards:
- Utility Knife: For cutting caulk or paint at the seams.
- Flat Pry Bar: To lift the baseboards without damaging them.
- Rubber Mallet: To tap the pry bar for stubborn areas.
- Putty Knife: Used as a protective buffer or for precision prying.
- Tape or Marker for Labeling: To keep track of which piece belongs where.
For an efficient process, ensure the tools are in good condition and designed for delicate work.
Preventing Damage to Walls
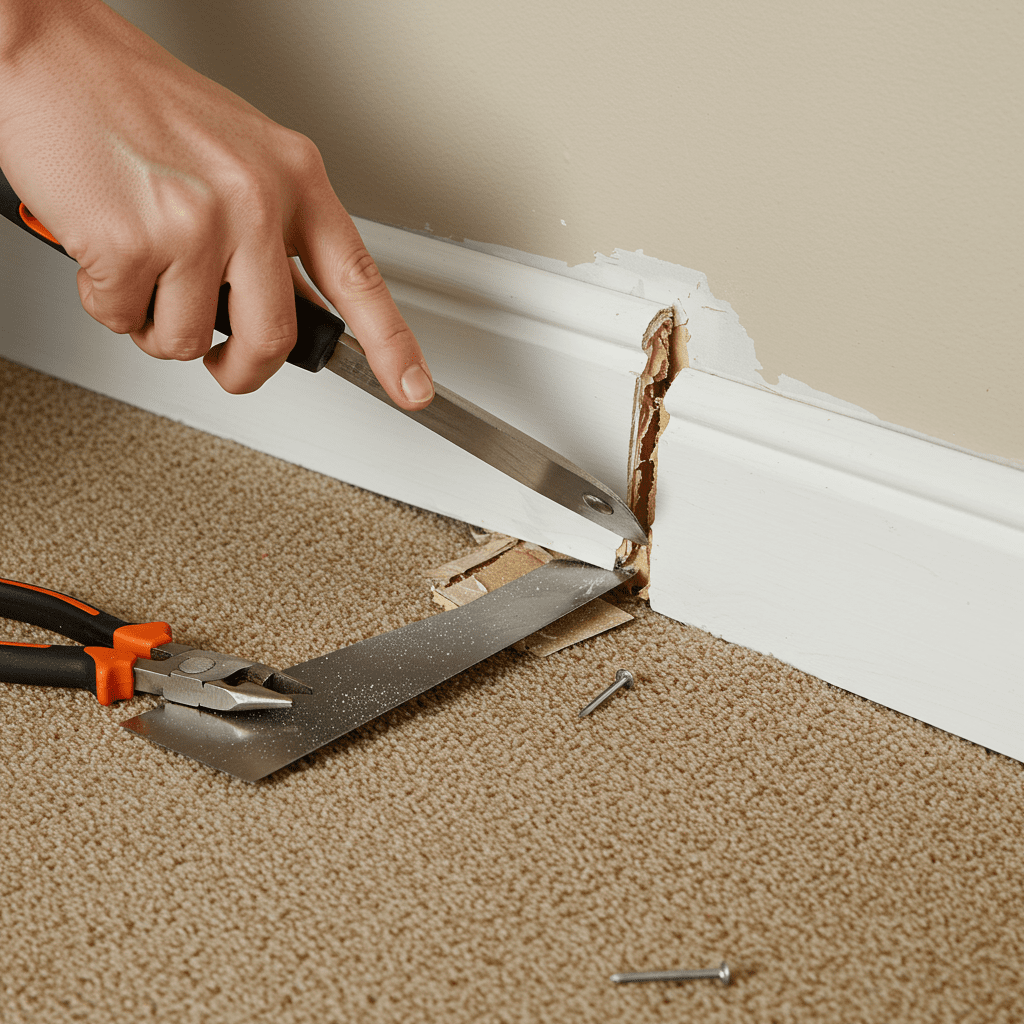
Use a Putty Knife as a Buffer: Place a putty knife between the pry bar and the wall to distribute the pressure and protect the drywall from dents or scratches.
Work Slowly and Evenly: Avoid rushing the process. Apply gentle but consistent force to lift baseboards gradually.
Inspect for Hidden Nails or Anchors: Check for nails or screws anchoring the baseboards to the wall. Remove them carefully with pliers to prevent cracking the trim or damaging the wall.
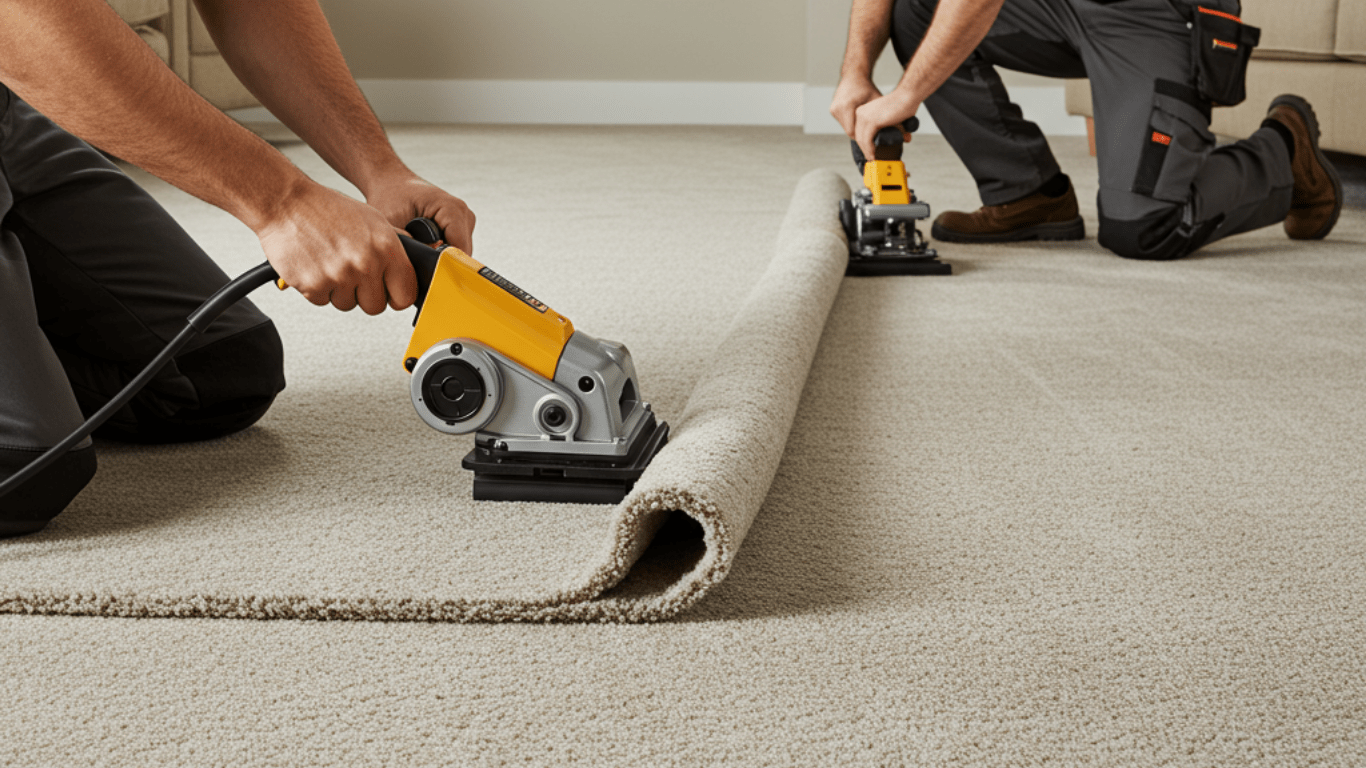
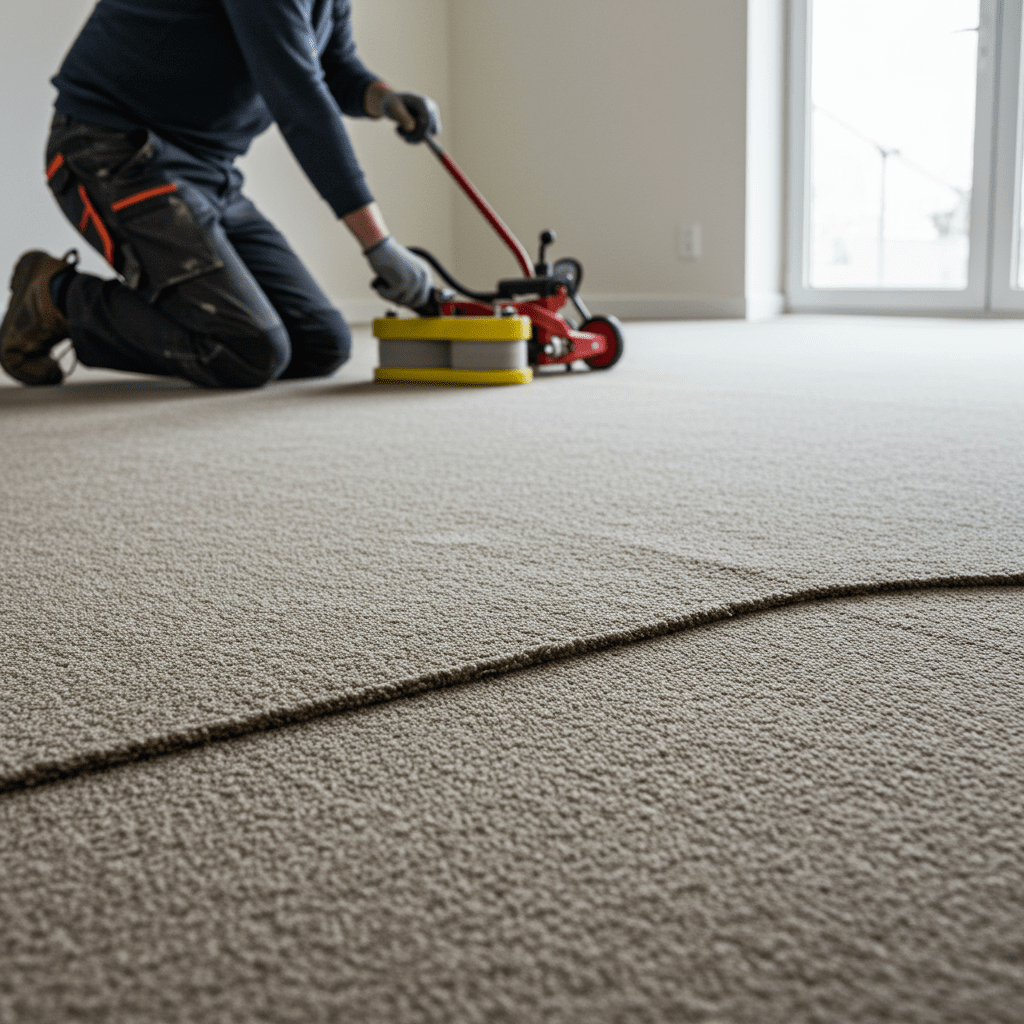
2. Positioning and Stretching Techniques
Using a Carpet Stretcher Correctly
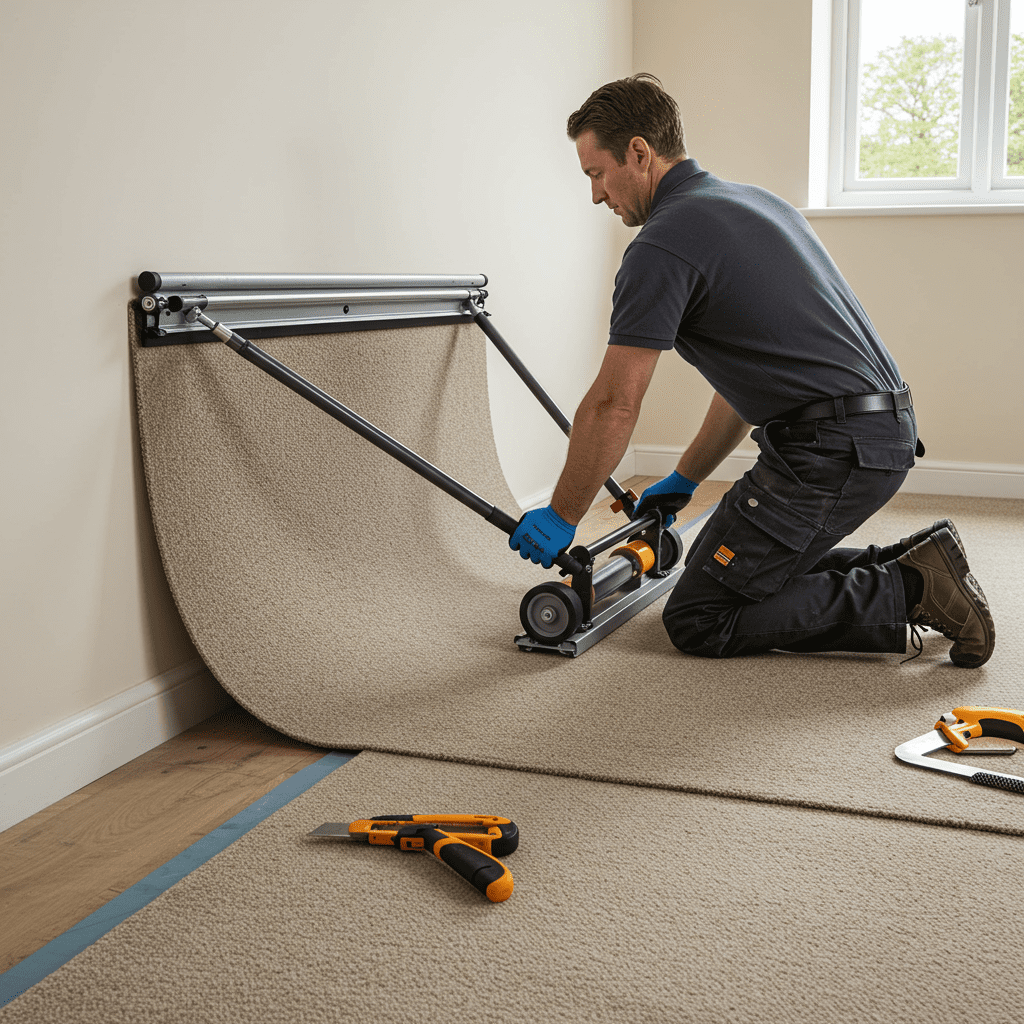
A carpet stretcher is the most effective tool for removing wrinkles and ripples while ensuring professional results. Proper use of this equipment guarantees that the carpet is pulled taut without risking damage.
Set Up the Carpet Stretcher: Position the stretcher along the edge of the room you’re working on. Secure the head against the wall while the tailpiece extends toward the opposite side of the room.
Adjust the Stretcher Length: Depending on the room size, adjust the length of the stretcher’s poles to span an optimal stretch distance.
Apply Controlled Force: Push down on the stretcher handle to pull the carpet firmly into place. Be sure to check that the stretching is even, paying attention to problem areas with significant wrinkles.
Anchor the Carpet: While holding the tension, secure the carpet onto the tack strips along the edges. This ensures the carpet stays in place once stretched.
Pro Tip: Always test the stretch in a small area first to ensure the tension isn’t causing undue strain on the material.
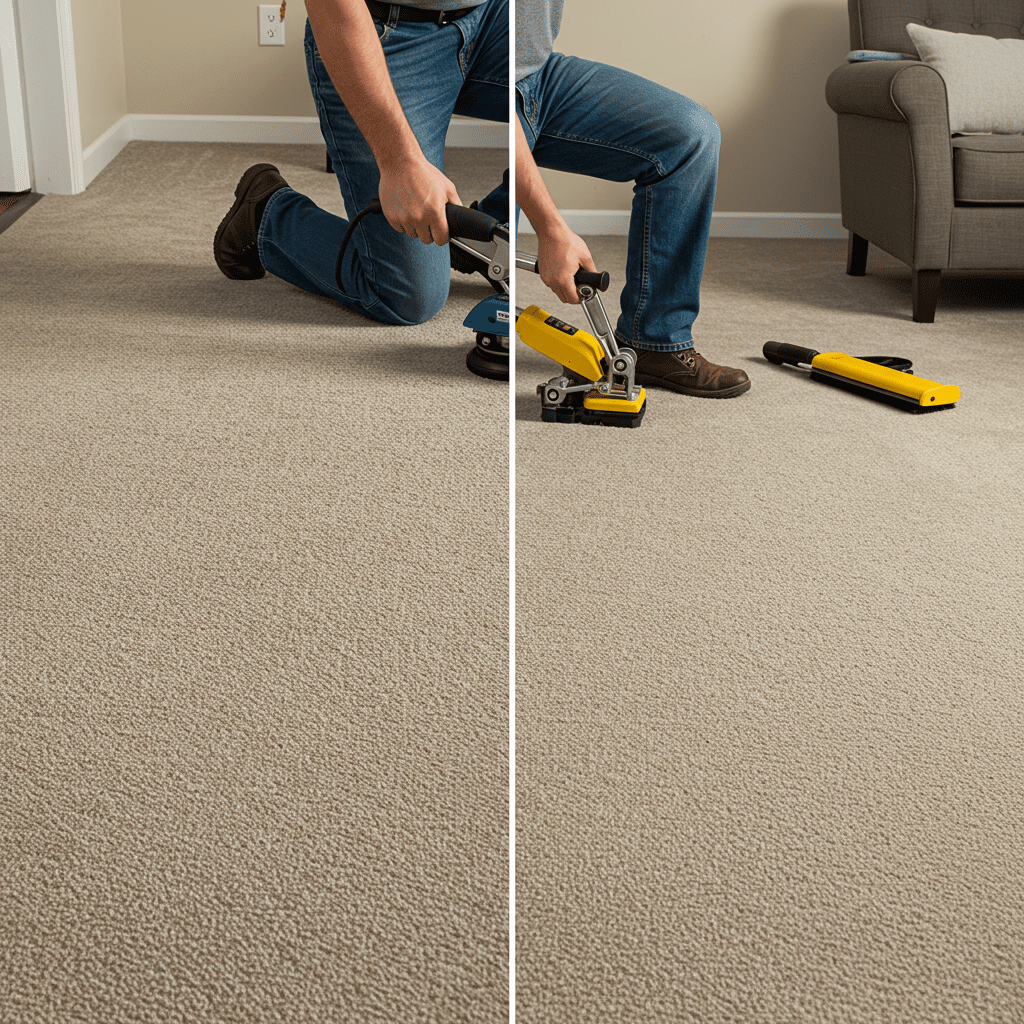
Proper Knee Kicker Methods
The knee kicker is ideal for working in tighter spaces, such as along walls or corners. This tool allows for detailed adjustments that complement the work of the carpet stretcher.
Position the Tool: Place the flat metal teeth of the knee kicker about 2–4 inches from the wall or edge where you’re working.
Align Your Knee: Use your knee to lightly hit the padded end of the tool. This action pushes the carpet forward, allowing it to grip the tack strips securely.
Work Section by Section: Move the knee kicker gradually along the edge of the carpet to ensure consistent stretching and alignment.
Safety Tip: Avoid putting excessive force into the knee kicks, as this can damage the carpet's fibers or backing material.
Achieving Uniform Tension
Uniform tension is critical for a seamless and professional look. Uneven tension can result in ripples or uneven wear over time.
Work from the Center Outward: Instead of starting from one wall, begin stretching from the center of the room and work outward toward the edges. This method ensures even distribution across the entire surface.
Check as You Go: After stretching each section, inspect the carpet to ensure there are no wrinkles or uneven spots. Adjust tension as necessary before securing the edges on the tack strips.
Revisit Problem Areas: For high-traffic sections or areas with persistent wrinkles, a second adjustment with the stretcher or knee kicker may be needed.
Related Read: How to Fix Carpet Burns: 4 Proven Methods to Restore Your Flooring (2025 Guide)
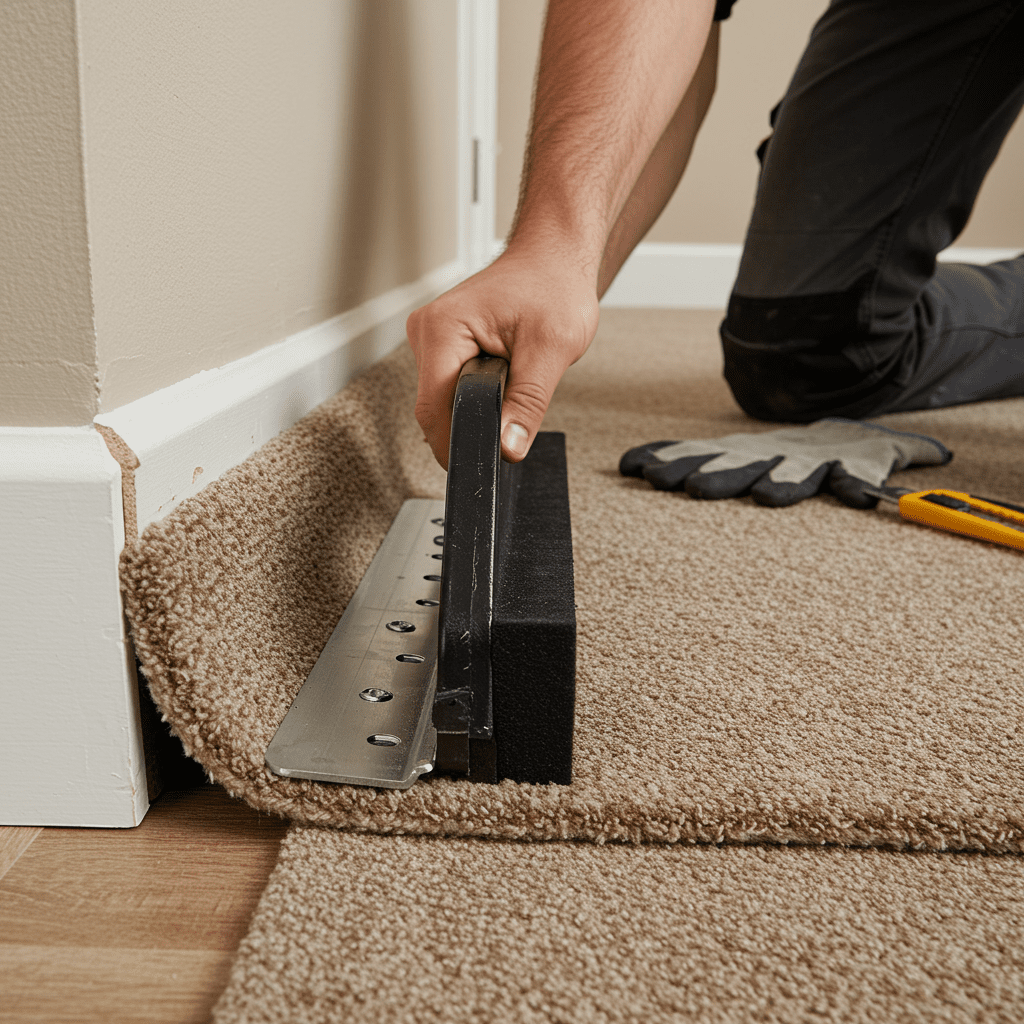
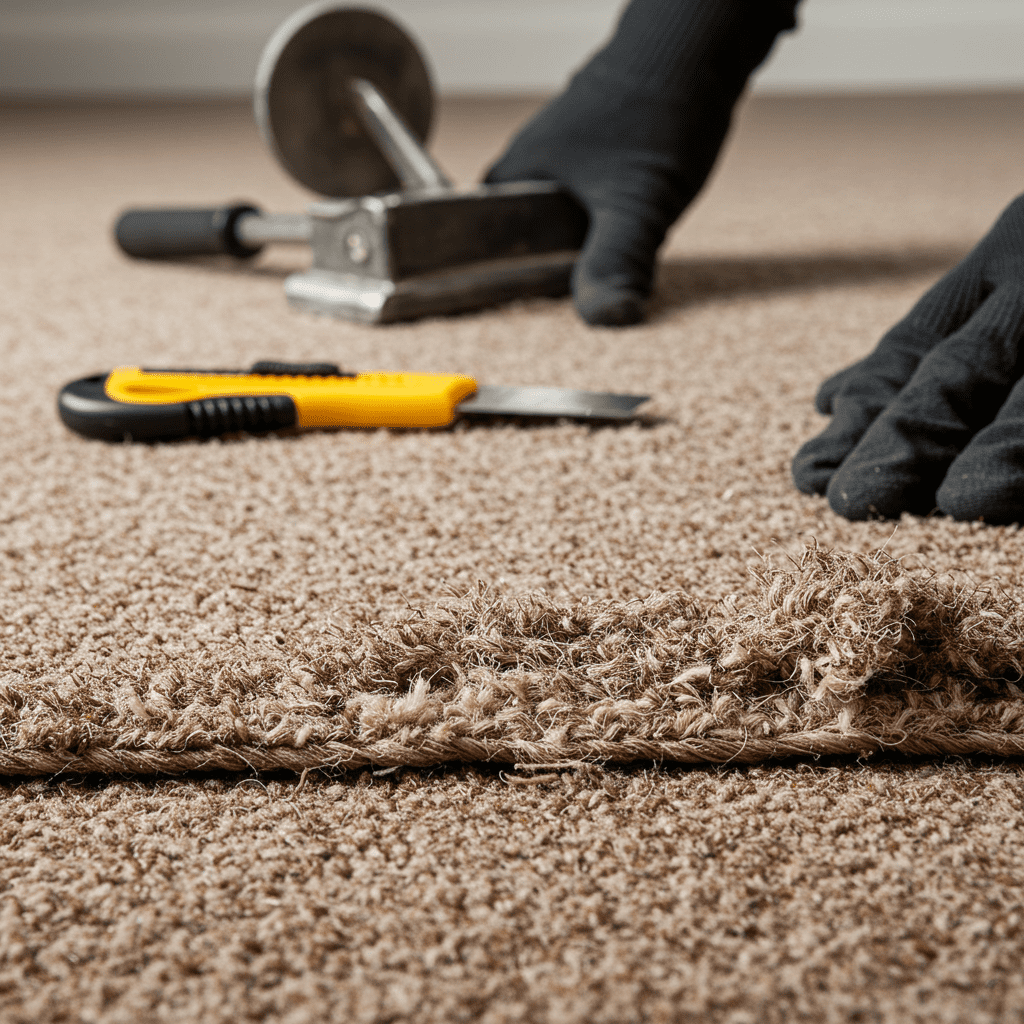
3. Trimming and Finishing
Once the carpet has been stretched and properly positioned, the final steps are all about polishing the look and ensuring everything is securely in place. Here’s how to handle trimming and finishing for flawless results:
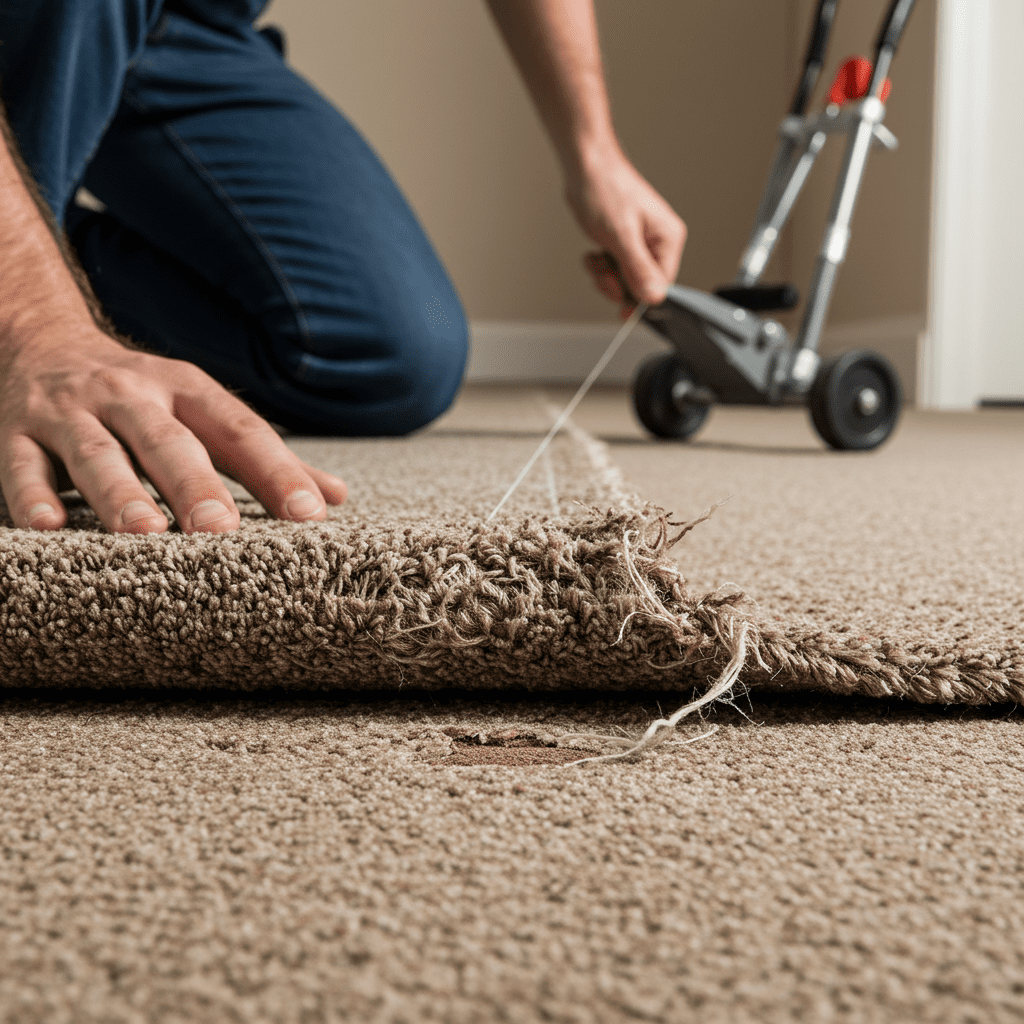
Cutting Excess Carpet
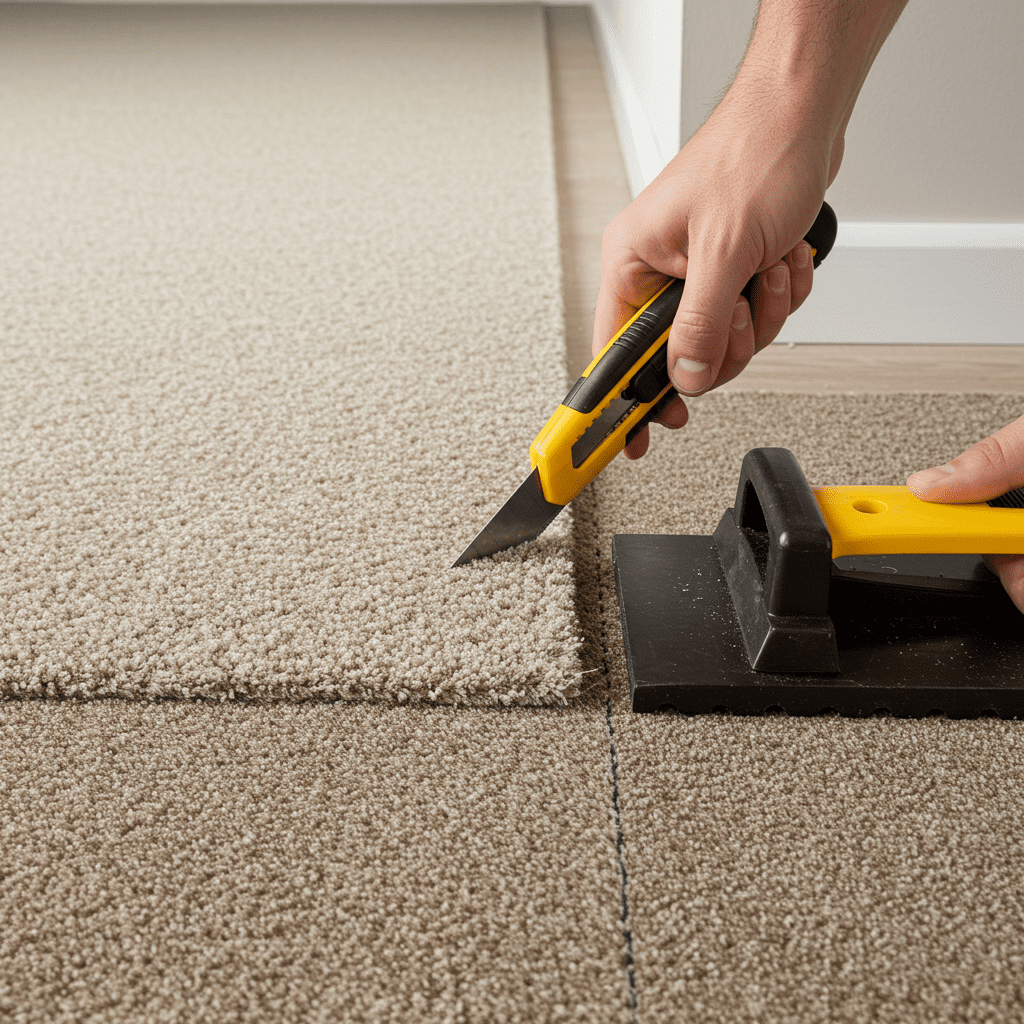
Use a Utility Knife for Precision: After stretching, there may be excess carpet overlapping the edges of the room. Use a sharp utility knife or carpet cutter to trim the excess material carefully.
Cut Along the Edge: Position the knife against the base of the wall or tack strips and guide it smoothly to ensure clean, straight cuts. Be careful not to cut too close to the edge, as the carpet needs to tuck under the baseboards or moldings.
Tuck the Carpet: Use a carpet tucker or the blunt side of a putty knife to neatly tuck the trimmed edges under the baseboards or into the gaps between the floor and the wall.
Pro Tip: Replace the utility knife blade frequently to ensure clean cuts and avoid frayed edges.
Reattaching Baseboards
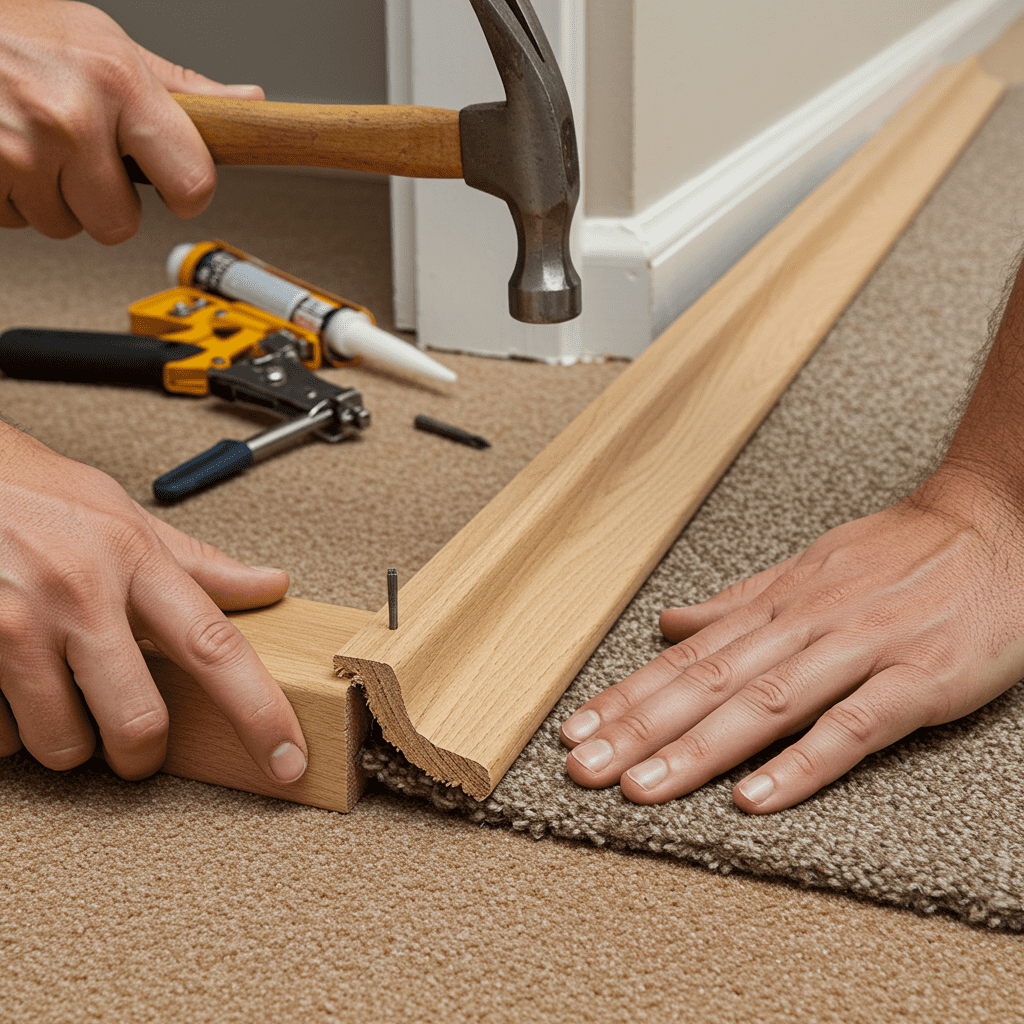
Reinstall the Baseboards: Carefully align the baseboards back into their original positions. Start with one wall and work your way around the room.
Secure Baseboards in Place: Use finishing nails and a hammer to reattach them. Gently tap to avoid splitting the wood. For a clean finish, countersink the nails and fill the holes with wood filler.
Reapply Caulk if Needed: Apply caulk along the top edge of the baseboards to seal any gaps between the trim and the wall. This step adds a professional touch to your flooring renovation.
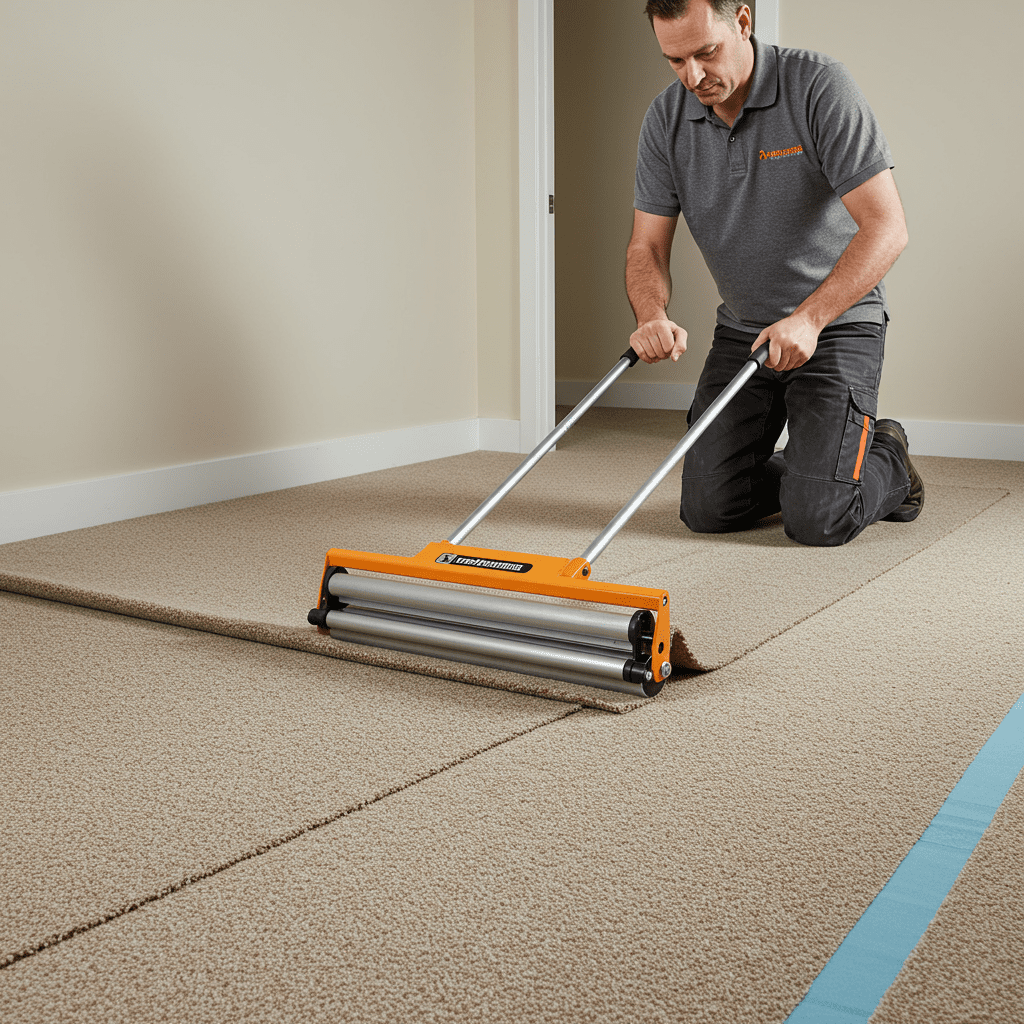
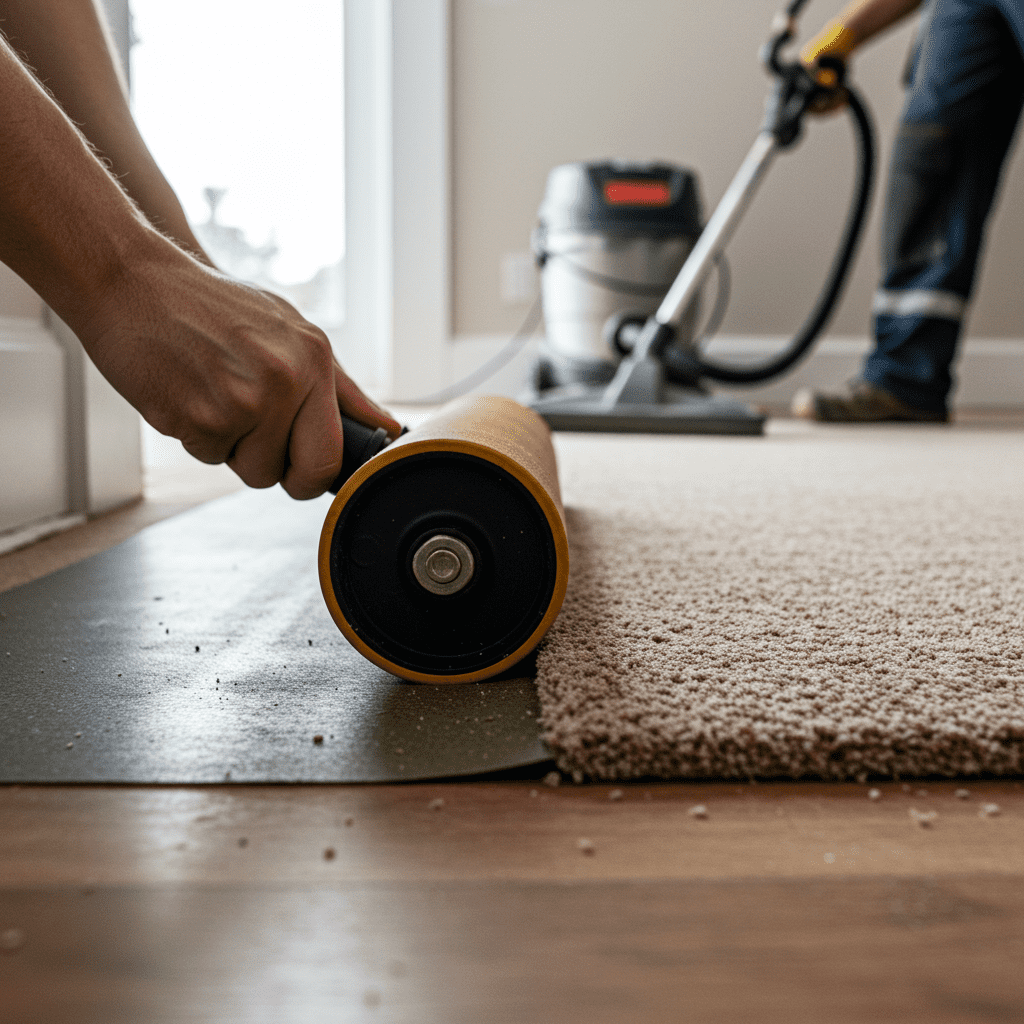
Ensuring Smooth Edges
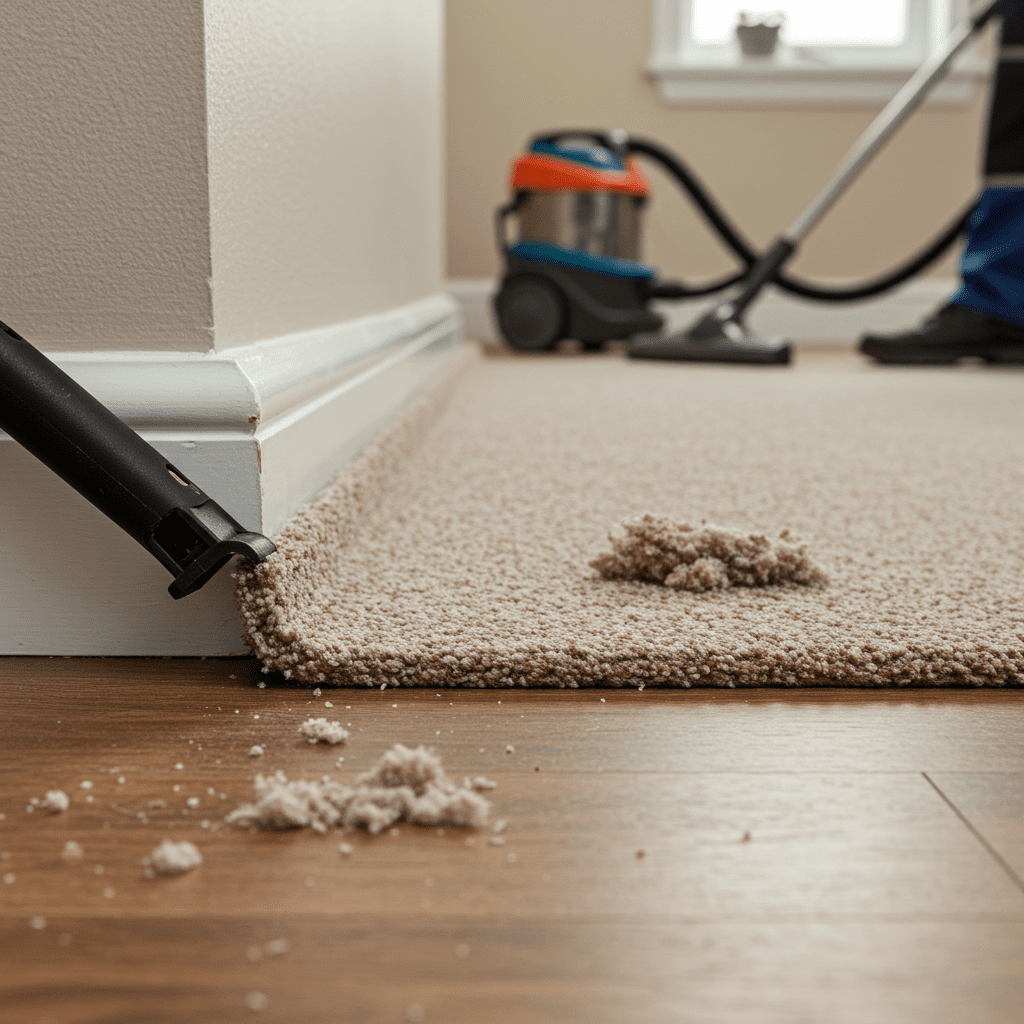
Inspect All Edges: After the excess carpet is trimmed, double-check each edge to ensure the carpet lies flat without any ripples or visible bumps.
Use a Carpet Roller: For extra precision, you can run a carpet roller along the edges to ensure secure attachment to the tack strips and eliminate any air pockets.
Clean Up the Area: Vacuum the room thoroughly to remove any loose carpet fibers or debris left over from the trimming process.
Pro Tip: Pay special attention to corners, as these areas are prone to uneven tucking or bulging. Take extra time to perfect the fit for a polished finish.
Related Read: Burned Carpet? Here’s How to Fix Cigarette Burns in Carpet Easily
Common Mistakes to Avoid
Carpet stretching is a precise process that requires care and attention. To achieve professional-quality results and avoid costly mistakes, here are the most common pitfalls to watch out for:
Potential Stretching Pitfalls
Skipping Pre-Stretching Preparation: Failure to inspect the carpet condition or identify potential challenges can result in improper results. Always clear the room, inspect the carpet, and mark problem areas before starting.
Using Incorrect Stretching Tools: Relying on tools like a knee kicker for large-scale jobs instead of a carpet stretcher can lead to uneven stretches and ineffective tension correction.
By recognizing these potential pitfalls early, you can ensure a smoother process with fewer errors.
Overstretching
One of the most common mistakes is applying too much force during the stretching process:
Risk: Overstretching causes undue strain on the carpet’s backing, leading to wear and tear. It may also pull the carpet away from its intended dimensions, leaving certain areas exposed or improperly aligned.
Solution: Always stretch with consistent and moderate force to achieve wrinkle removal while preserving the integrity of the material.
Uneven Tension
Failure to achieve uniform tension during stretching often results in visible ripples or uneven surfaces.
Risk: Uneven tension creates weak spots that may begin lifting over time or cause uneven flooring maintenance.
Solution: Work from the center of the room outward and use smaller tools like a knee kicker to fine-tune tight areas. Inspect frequently and adjust wherever necessary to maintain smooth, even tension across the entire carpet.
Damaging Carpet Fibers
Improper handling of tools can accidentally damage carpet fibers, making the surface appear rough or frayed.
Risk: The use of dull blades while trimming or excessive force with a knee kicker can lead to permanent damage to the carpet’s appearance.
Solution: Always use sharp utility knives for clean cuts and avoid pressing tools excessively against the carpet pile. For delicate movements, consider wearing protective gloves for better control.
Pro Tip: If you’re attempting DIY carpet stretching for the first time, consider consulting online resources or tools guides to ensure you’re handling the equipment properly. For large-scale fixes or expensive carpets, opting for professional carpet care is often the safest choice.
Related Read: Should Carpet Be Replaced After Water Damage? Expert Insights You Need to Know
Cost Considerations
Carpet stretching can vary significantly in cost depending on whether you choose a DIY approach or hire professional services. Understanding these expenses and their long-term impact can help you make an informed decision.
DIY Stretching Expenses
For those tackling carpet stretching as a DIY project, the costs largely depend on the tools and supplies required:

While DIY is initially cheaper, it requires time, patience, and a good understanding of carpet stretching techniques to avoid errors such as overstretching or uneven tension, which could lead to costly repairs later.
Professional Service Pricing
Hiring professionals to stretch your carpet ensures a polished finish without the risk of DIY mistakes. The cost varies based on factors like room size, carpet condition, and geographic location:
Typical Cost Range: $100–$300 per room.
Additional Fees: Some professional services charge extra for tasks like reattaching baseboards or addressing pre-existing carpet damage.
While professional carpet care is more expensive upfront, it guarantees precise tension correction, wrinkle removal, and a result that lasts longer compared to most DIY efforts.
Long-Term Value Analysis
When analyzing the costs of DIY versus professional carpet stretching, consider the long-term value:
DIY Advantages:
Lower initial cost. A great option for small rooms or areas without significant damage.
DIY Disadvantages:
Higher risk of mistakes leading to uneven tension or damaged fiber, requiring further repairs. Time-intensive, especially for beginners.
Professional Advantages:
Ensures proper installation techniques, extending the carpet’s lifespan. Saves time, offering a hassle-free process.
Professional Disadvantages:
Higher upfront costs. In most cases, professionals provide better long-term value as their expertise reduces the likelihood of additional repairs or premature carpet replacement.
Related Read: Clever Carpet Repair: How to Fix a Hole in Carpet Without Extra Carpet
Conclusion
Mastering carpet stretching can elevate your flooring from worn and wrinkled to smooth and professional. This process not only enhances the aesthetic appeal of your space but also contributes significantly to flooring maintenance by preventing premature wear and tear.
With the right tools, such as a carpet stretcher and knee kicker, proper techniques, and a little patience, you can tackle this project confidently. From careful trimming and finishing to achieving uniform tension, every step plays a role in extending your carpet’s life and maintaining a beautiful interior.
However, not every task is meant to be DIY. When faced with challenges like uneven tension, damaged fibers, or complex room layouts, consulting a professional is often the best choice. Experts in professional carpet care can eliminate the risks of mistakes while ensuring long-lasting results that protect your investment.
FAQs
How often should I stretch my carpet?
Typically every 3-5 years or when visible wrinkles appear.
Can I stretch the carpet myself?
With proper tools and technique, yes. However, complex jobs might require professional help.
How long does carpet stretching take?
1-3 hours for an average room, depending on size and complexity.
Will stretching fix all carpet issues?
It resolves wrinkles and minor deformations, but cannot repair significant damage.
What’s the cost of professional carpet stretching?
Ranges from 100−100−300 per room, depending on size and location.
2 thoughts on “Carpet Stretching 101: The Ultimate Guide to Smooth, Flawless Floors”