
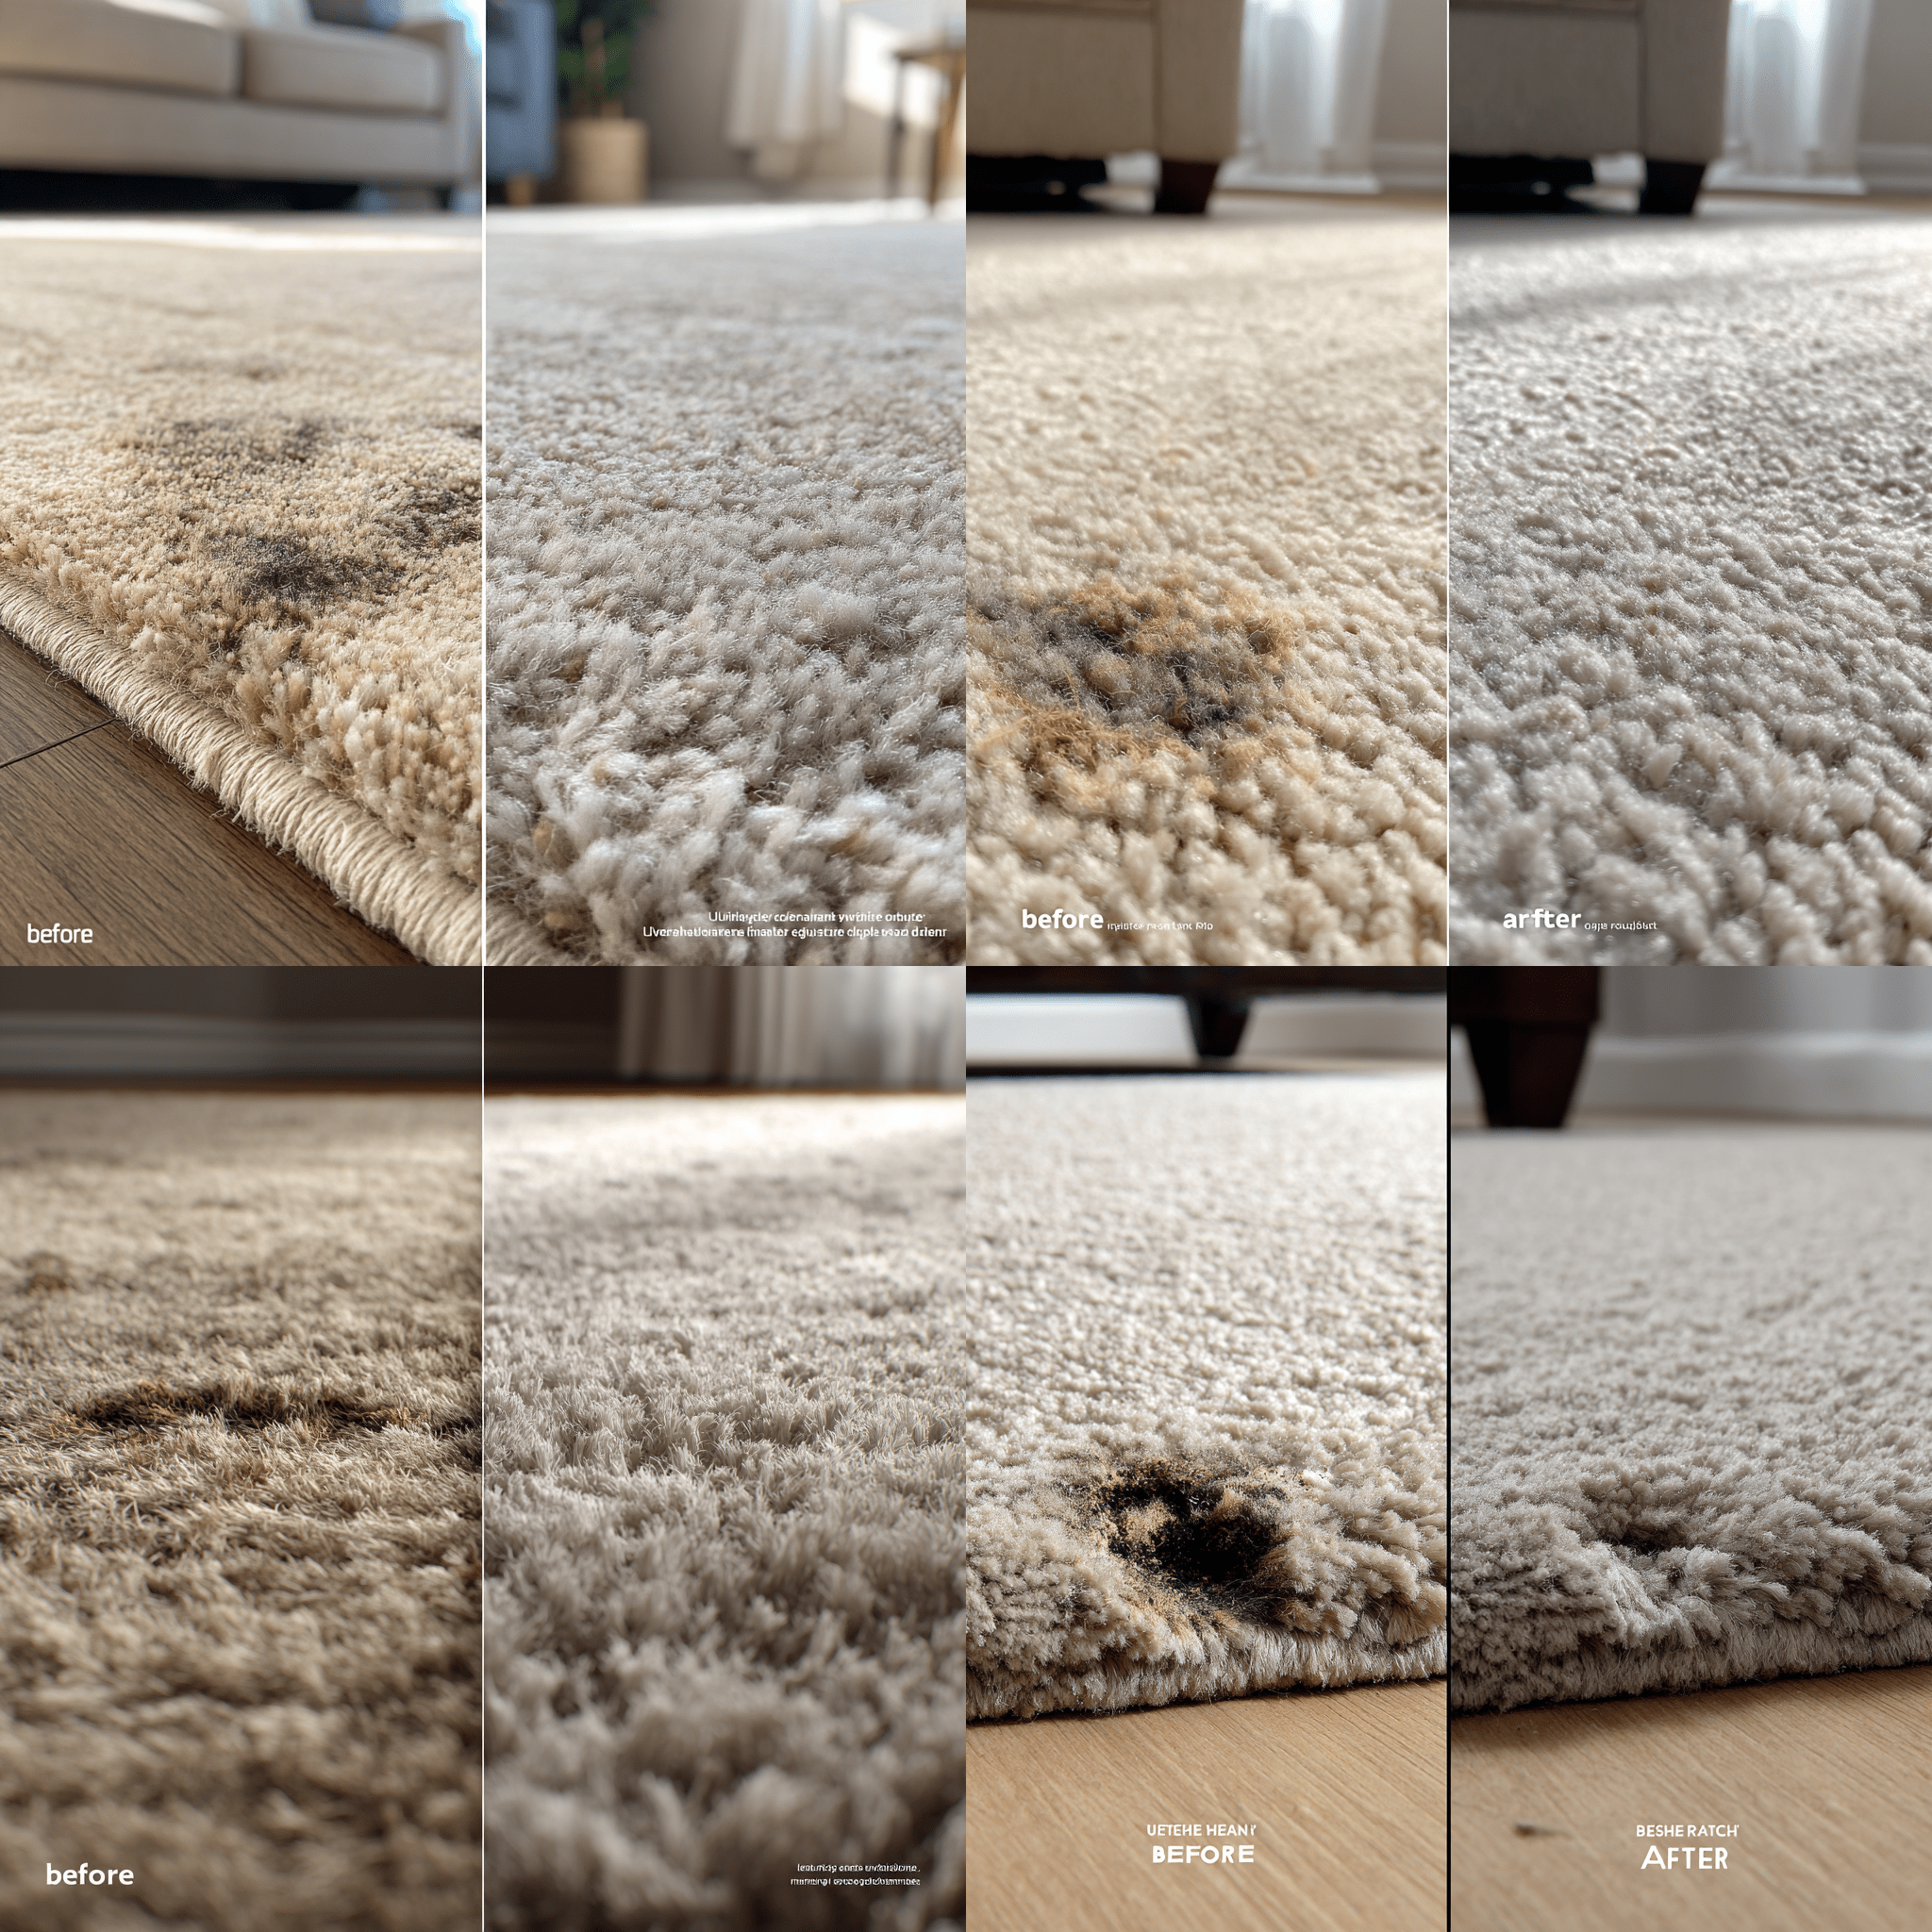
Did you know that carpet damage accounts for 15% of flooring replacements annually, costing homeowners thousands of dollars? Carpet burns specifically are among the most common and frustrating types of damage, stemming from everyday accidents involving irons, curling wands, or even misplaced candles.
So, what exactly are carpet burns? These occur when intense heat or chemicals singe, melt, or discolor carpet fibers. Left unattended, even minor burns can worsen over time, ruining the appearance of your flooring and potentially leading to costly replacements.
But don’t worry—replacing the entire carpet isn’t your only option! From simple surface cleaning techniques to patching and fiber transplantation, there are effective, budget-friendly solutions that can restore your carpet’s original look.
In this guide, we’ll provide step-by-step instructions for tackling various carpet burns, helping you save money, time, and stress. Whether you’re dealing with minor scorch marks or deeper burns, you’ll walk away equipped with techniques to fix the damage yourself or know when to call in a pro. Let’s get started!
Understanding Carpet Burns: Types and Causes

Carpet burns can be sneaky, but they’re not all created equal. Understanding the type of damage and its cause is the first step toward effective repair. Let’s break it down.
Types of Carpet Burns
Surface Burns:
These are minor cases where only the tips of the carpet fibers are singed or slightly discolored. They often occur due to brief exposure to heat or sparks and don’t penetrate deeply into the carpet.
Deep Burns:
Caused by prolonged exposure to high heat, deep burns result in visible holes in the carpet. These burns compromise the carpet’s integrity and often require patches for repair.
Melting Damage:
Common in synthetic carpets, this type of burn occurs when fibers melt together due to extreme heat. Melting damages the texture of the carpet, leaving behind a hardened, shiny surface.
Scorch Marks:
These are discolorations caused by heat exposure that doesn’t damage the fibers directly, but leaves behind unsightly stains. Scorch marks are often seen after mild contact with hot objects.
Common Causes
Carpet burns stem from a range of everyday accidents. Here are the main culprits:
Iron Accidents:
Even a moment of placing a hot iron down can leave behind permanent marks.
Cigarette Burns:
Dropping or forgetting a lit cigarette can lead to small but stubborn burn marks, especially on lower pile carpets.
This may help: Burned Carpet? Here’s How to Fix Cigarette Burns in Carpet Easily
Hot Objects:
Items like curling irons, space heaters, or cookware can scorch carpets if mishandled.
Fireplace Sparks:
Homes with open fireplaces or wood-burning stoves are prone to stray sparks and embers causing widespread burns.
Chemical Reactions:
Spills of caustic or high-heat chemicals, such as cleaning agents, can overheat carpets or cause discoloration.
When to DIY vs. Call Professionals
Not all carpet burns are created equal, and the size, severity, and type of carpet damage determine whether a DIY approach will work or if calling a professional is the better choice. Let’s outline the scenarios where you can tackle the problem yourself and when expert intervention is necessary.
DIY-Friendly Scenarios
If your carpet burn falls into one of these categories, a DIY repair is a cost-effective and manageable solution:
Burns Smaller than a Quarter:
Small burns caused by cigarettes or sparks are easy to fix with simple tools and techniques like fiber transplantation or surface cleaning.
Surface-Level Damage Only:
If the fibers have only been singed or lightly scorched, there’s no need to replace larger sections of the carpet.
Matching Carpet Remnants Available:
Got leftover pieces from a prior installation? These remnants can seamlessly patch moderate burns without needing an entirely new carpet.
Low to Medium Carpet Pile:
Repairs are far easier on carpet with a shorter pile since it’s more forgiving when disguising patches or seams.
Professional Help Needed
Sometimes, attempting a repair yourself can make things worse. In the following cases, hiring an expert is highly recommended:
Burns Larger than 2 Inches:
For sizeable burns, DIY solutions like patching or fiber transplantation may lose effectiveness, especially for preserving the original look of the carpet.
Multiple Burn Spots:
Scattered burns can make the floor look patchy if not repaired consistently. Professionals can tackle multiple spots with advanced techniques seamlessly.
Expensive or Antique Carpets:
High-end rugs or carpets made of delicate materials require careful handling to avoid damaging their value or appeal.
Complex Patterns or High-End Materials:
Intricate designs and specialty fibers require skills and tools beyond DIY capabilities to ensure the repair is invisible and aligns perfectly.
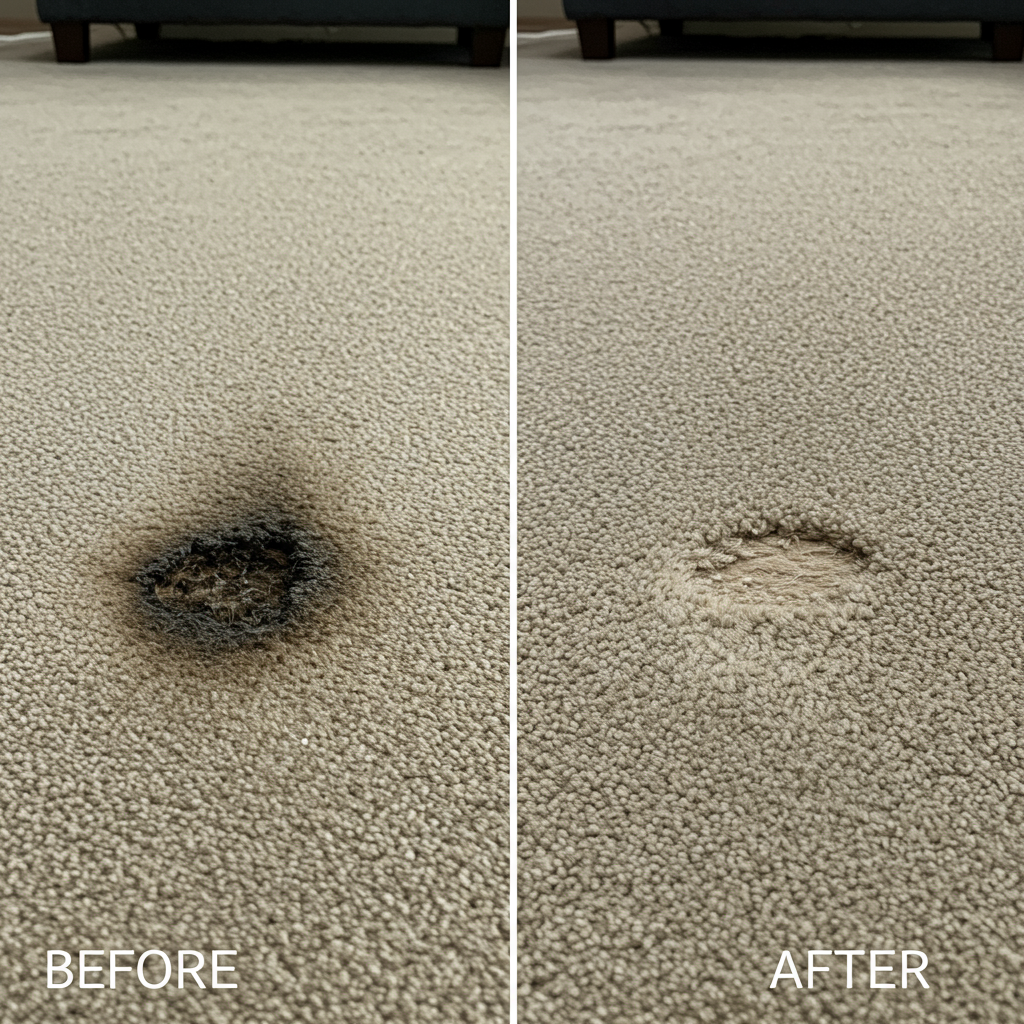
Method 1: Surface Burn Cleaning (Minor Damage)

Minor carpet burns often affect just the tips of the fibers, leaving behind slight discoloration or charring. For these types of surface-level burns, cleaning and restoring the area is quick, easy, and affordable.
Materials Needed:
- Fine-grit sandpaper or nail file (to remove the charred fibers)
- Vacuum cleaner (to clean up debris)
- Clean cloth
- Mild detergent solution
Step-by-Step Process:
Assess the Damage:
Carefully examine the burn area to confirm that it only affects the surface fibers. If no holes or deep burns are present, this method is suitable.
Gentle Sanding:
Using fine-grit sandpaper or a nail file, lightly sand away the blackened or charred tips of the fibers. Be careful not to over-sand, as this could create uneven textures in the carpet.
Vacuum Thoroughly:
Once the excess debris has been sanded or filed off, use a vacuum cleaner to remove the loose fibers and dust.
Clean the Area:
Dampen a clean cloth with a mild detergent solution and gently rub the affected area to remove any remaining residue or discoloration. Avoid over-wetting the carpet, as this can damage the adhesive backing.
Brush and Fluff:
Once the area is dry, gently brush the fibers to restore their texture and blend them into the surrounding carpet.
When to Use This Method:
Surface burn cleaning works best for:
- Small scorch marks or minor burns from objects like a cigarette or curling iron.
- Discoloration that doesn’t extend deeply into the carpet fibers.
Method 2: Carpet Patching (Moderate to Severe Burns)
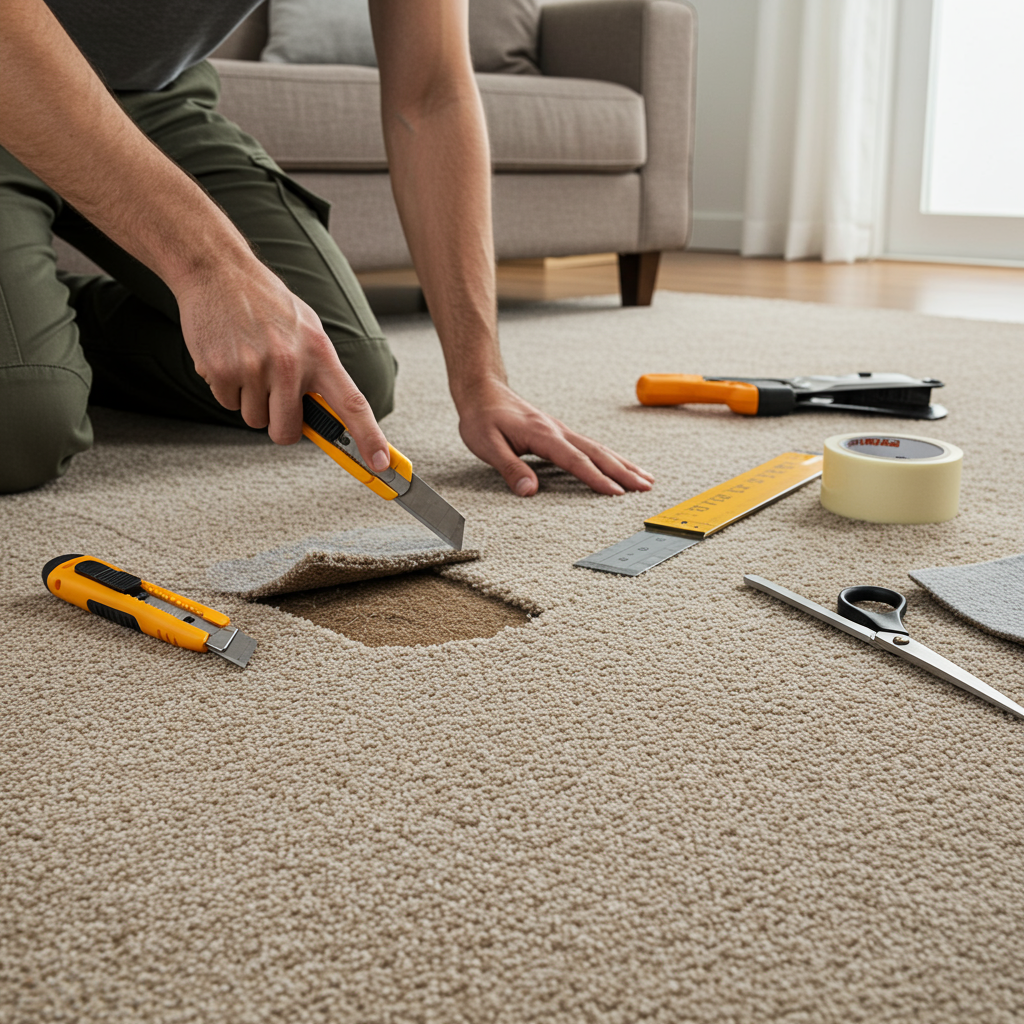
When dealing with burns that extend beyond the surface fibers or have caused holes in the carpet, carpet patching is one of the most effective repair methods. This technique removes the damaged section and replaces it with a matching patch to restore the area seamlessly.
Materials Required:
- Matching carpet remnant (preferably from leftover installation or hidden areas like closets)
- Sharp utility knife (to cut clean edges)
- Carpet adhesive or double-sided tape (for securing the patch)
- Seaming iron (optional for professional-grade finishes)
- Heavy books (to apply weight while curing)
Instructions:
Cut Out the Damaged Area:
Use a sharp utility knife to remove the burned section of the carpet. Cut clean, straight edges to ensure the patch fits perfectly.
Measure and Cut Replacement Patch:
Take the damaged piece you removed and use it as a template to cut the matching carpet remnant. Make sure the patch is exactly the same size as the hole you cut out.
Prepare the Backing:
Clean the subfloor area underneath the damaged section to remove any debris or adhesive residue. A smooth and clean surface ensures proper bonding for the new patch.
Apply Adhesive:
Spread carpet adhesive or use double-sided tape around the edges of the hole and on the backing area. Ensure the adhesive is applied evenly to avoid bubbles or lifting.
Install the Patch:
Align the patch carefully, ensuring the carpet grain and direction match the surrounding area. Missing this step can make the repair look obvious.
Weight and Cure:
Place heavy books or an equivalent weight on top of the patch and leave it to cure for at least 24 hours. This ensures the patch adheres firmly to the backing.
Blend the Seams:
Use a brush or comb to blend the fibers of the patch with the surrounding carpet. This step helps disguise the edges and makes the patch less noticeable.
When to Use This Method:
Carpet patching is ideal for:
- Moderate to severe burns that leave holes or destroy fibers significantly.
- Scenarios where you have matching carpet remnants available.
Method 3: Fiber Transplantation (Small Burns)
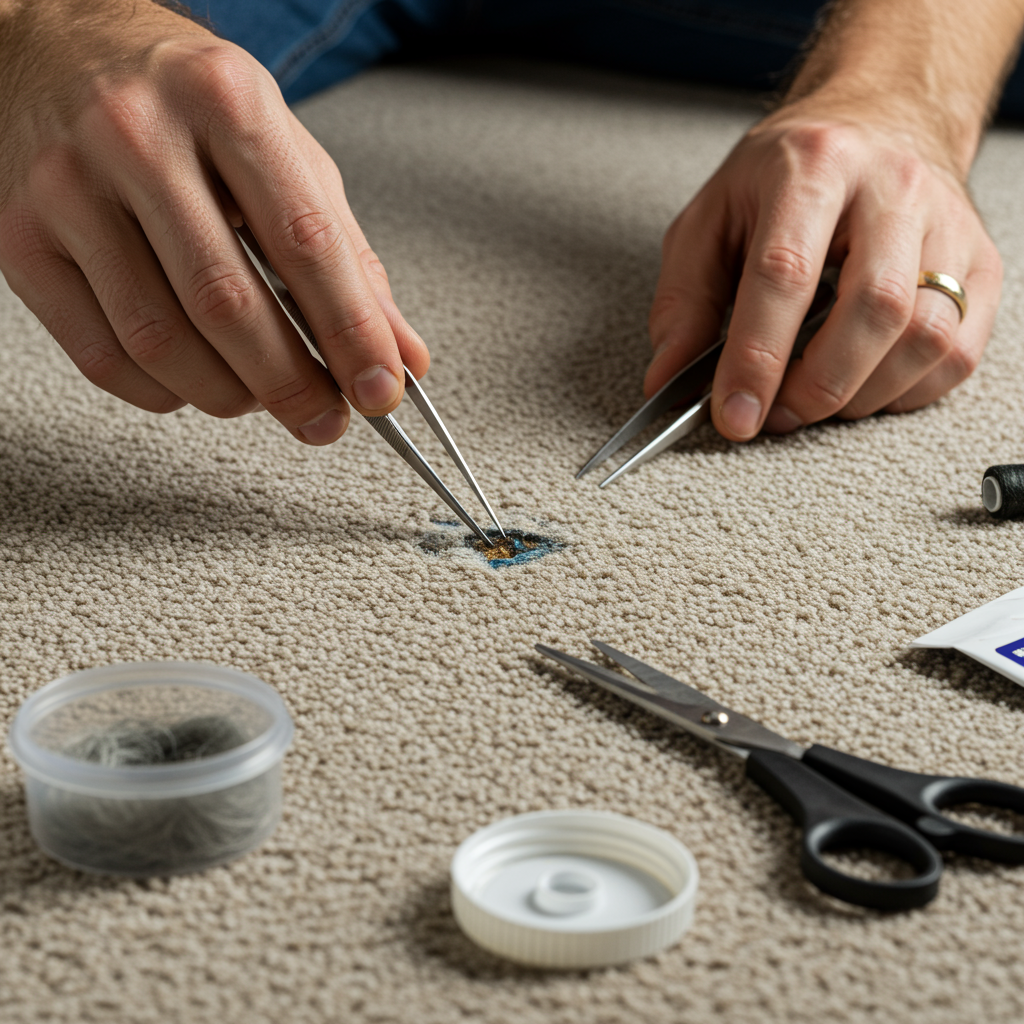
Fiber transplantation is a quick and effective solution for tiny burn holes caused by cigarette ashes, sparks, or small heat damage. This technique allows you to seamlessly repair small areas using spare carpet fibers, leaving the area virtually undetectable.
When to Use This Method:
Choose fiber transplantation if:
- The burn hole is the size of a pencil eraser or smaller.
- You have matching carpet fibers available from hidden sections like closets or under furniture.
- A fast and low-cost fix is needed.
Process
Harvest Donor Fibers:
Locate hidden carpet areas such as corners of closets, under furniture, or borders where spare fibers can be removed without affecting visibility. Use scissors to gently trim fibers from these sections.
Prepare the Burn Site:
Remove any loose or damaged fibers from the burn hole using tweezers or a small brush. Ensure the area is clean and free of debris before applying glue.
Apply Fabric Glue:
Carefully add a small amount of fabric glue into the burn hole. Avoid using excess glue to prevent clumping or hardening.
Insert New Fibers:
Place the harvested fibers into the burn hole, ensuring they match the surrounding fibers in height, direction, and density. Use tweezers to position and adjust the fibers precisely.
Trim to Level:
Once the glue is dry, trim the transplanted fibers to match the height of the surrounding carpet. Fluff and brush the fibers to blend seamlessly.
When It’s Most Effective:
Fiber transplantation works best for areas with minimal damage and requires just a few fibers for repair. This method allows for quick fixes without the need for visible patches or extensive tools.
Method 4: Professional-Grade Techniques
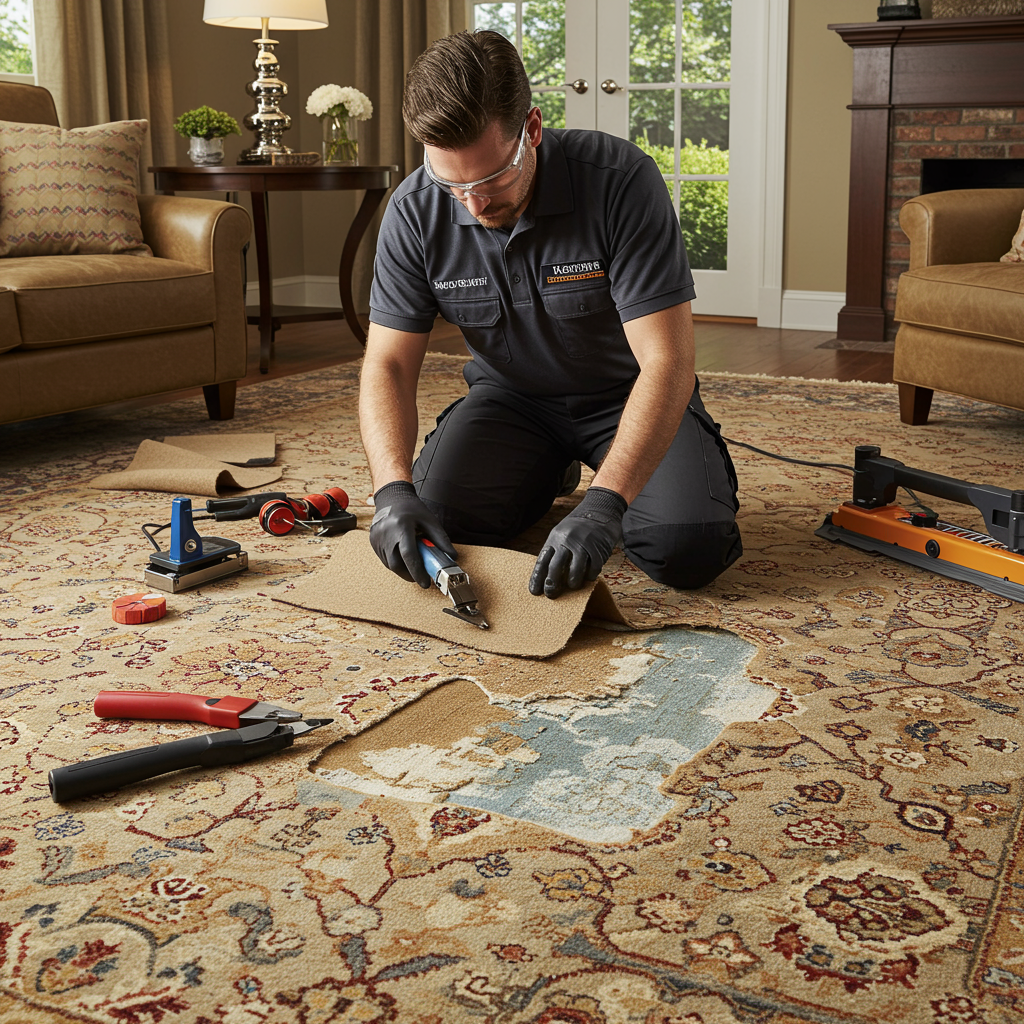
For significant or complex carpet burns—especially on high-value carpets or intricate designs—professional-grade techniques offer superior results. These methods require specialized equipment and skills to ensure repairs are seamless and undetectable. Below are two commonly used approaches by professionals.
Heat Bonding Method
Heat bonding is a highly effective repair technique for severe burns, combining heat and adhesive to bond replacement sections with the surrounding carpet seamlessly.
Equipment Needed:
- Carpet seam iron
- Carpet tape (heat-activated adhesive)
- Precision trimming tools
Temperature Control:
- Professionals carefully monitor the temperature of the seam iron to avoid damaging the surrounding carpet fibers or causing additional burns.
Safety Considerations:
- Proper ventilation is essential, as some adhesives release fumes during the bonding process.
- Adequate protective gear (like gloves) should be used when handling heat-activated materials and tools.
Invisible Mending
Invisible mending is ideal for high-end or antique carpets where maintaining the original look is critical. This method focuses on blending fibers and matching colors to disguise burns.
Color Matching Techniques:
- Professionals analyze the carpet’s color and texture to create a perfect match using spare carpet material or fibers.
- Dyeing techniques can also be employed for precise color alignment.
Fiber Blending Methods:
- Using specialized brushes or tools, experts blend replacement fibers into the surrounding carpet to mimic the original height, density, and direction.
Advanced Tools Required:
- Microscopic trimming and blending tools ensure repairs are virtually invisible.
- Specialized adhesives are used for strong but subtle bonding.
When to Opt for Professional Techniques:
These methods are most suitable when:
- The damage is extensive or located on expensive carpets.
- Attempting DIY methods may worsen the damage or fail to restore intricate patterns effectively.
- Insurance claims or warranty requirements necessitate professional documentation.
Protecting Your Carpet from Future Burns
Preventing carpet burns is much easier—and far less costly—than repairing them. By taking proactive steps and incorporating safety measures into your daily habits, you can protect your carpets from damage caused by heat, fire, or accidents.
Safety Measures
Heat Source Management:
Position appliances like irons, curling wands, and space heaters on stable, heat-resistant surfaces, away from carpeting. Never leave hot items unattended near carpeted areas.
Smoking Safety:
Set up designated smoking areas outdoors or use ashtrays with proper extinguishing mechanisms. Avoid indoor smoking near rugs or carpets, as stray ashes are one of the most common burn culprits.
Child-Proofing Your Home:
Install safety gates to keep children away from fireplaces, irons, and space heaters. Cover electrical outlets to prevent accidental appliance use near carpets.
Regular Maintenance:
Schedule professional carpet cleanings to remove debris and maintain the integrity of your carpet fibers—especially for high-pile or expensive carpeting. Inspect carpets regularly for signs of wear, discoloration, or thinning areas that may be more prone to burns.
Protective Products
Carpet Protectors and Mats:
Use heat-resistant mats under appliances or in areas near fireplaces to create an insulating barrier between heat sources and carpet fibers. Durable mats can also protect carpets in high-traffic zones prone to accidental damage.
Heat-Resistant Pads:
Place pads under curling irons, blow dryers, or other heat-generating tools to shield carpet from direct contact with heat sources.
Flame Retardant Treatments:
Apply flame-retardant sprays or treatments to carpets, especially in areas with high fire risk like near fireplaces or kitchens.
These treatments act as a safeguard, minimizing burns and extending your carpet’s lifespan.
Related Topic: Should Carpet Be Replaced After Water Damage? Expert Insights You Need to Know
Cost Analysis: Repair vs. Replacement
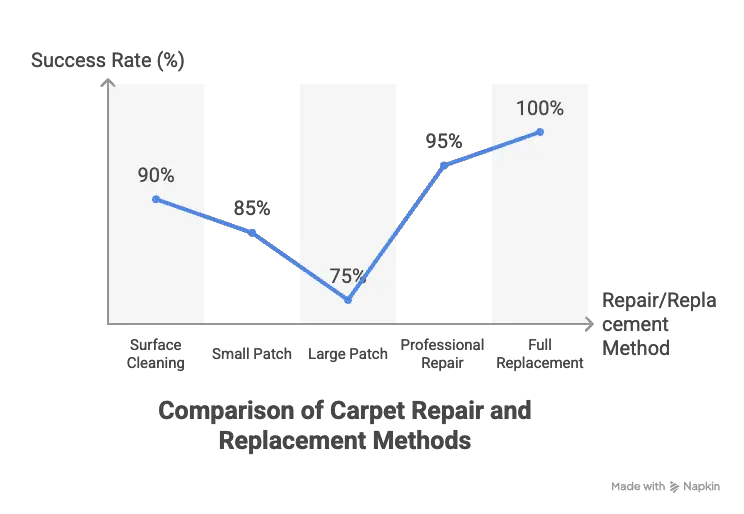
When it comes to carpet burns, deciding between repairing the damage or going for a full replacement often comes down to time, cost, and success rate. While repairs can save you money in most cases, certain scenarios—such as extensive damage—may require a complete replacement.
Below is a breakdown of typical costs, time estimates, and the success rates associated with different repair methods.
| Repair Method | Cost Range | Time Required | Success Rate |
|---|---|---|---|
| Surface Cleaning | 5–5–15 | ~30 minutes | 90% |
| Small Patch | 20–20–50 | 1–2 hours | 85% |
| Large Patch | 50–50–150 | 2–4 hours | 75% |
| Professional Repair | 100–100–300 | 1 day | 95% |
| Full Replacement | 500–500–2000+ | 2–3 days | 100% |
Key Considerations
Surface Cleaning:
Best for: Minor burns, such as light scorch marks or singed fibers.
Low-cost option with minimal time investment. Highly successful for surface-level damage.
Small Patch:
Best for: Burns smaller than 2 inches with matching carpet scraps.
Affordable and relatively simple as long as you have the right materials.
Large Patch:
Best for: Moderate burns or larger holes.
Success depends on your skill level and the availability of matching carpet.
Professional Repair:
Best for: Large, complex burns on high-value or delicate carpets.
While more expensive, professionals often achieve near-flawless results.
Full Replacement:
Best for: Extensive damage across multiple areas or highly visible floors.
Offers the most definitive solution but is time-consuming and costly.
Repair or Replace?
Ultimately, the decision depends on:
- Extent of damage: Small, isolated burns are often repairable, while widespread or severe burns may warrant replacement.
- Value of the carpet: High-quality carpets may benefit more from professional repairs than replacement.
- Budget constraints: Repairs are almost always more affordable in the short term, while replacements guarantee a pristine look for the entire floor.
This my help: Types of Carpet Damage: A Complete Guide to Identification, Prevention & Repair
Maintenance After Repair
Proper maintenance after repairing carpet burns is essential to ensure the fix lasts and blends seamlessly with the rest of the flooring. Following these immediate and long-term care tips will not only protect the repaired area but also extend the life of your carpet.
Immediate Care (First 48 Hours)
Avoid Heavy Traffic:
Keep the repaired area free from any foot traffic to allow adhesive or patched material to set properly.
No Moisture Exposure:
Prevent spills or cleaning around the area, as moisture can weaken adhesives or cause fibers to lift.
Monitor for Lifting Edges:
Inspect the repaired spot regularly during the first 48 hours for any signs of edges lifting or uneven bonding.
Document with Photos:
Take clear photos of the repaired area for future reference or warranty purposes, especially if professionals were involved.
Long-Term Maintenance
Regular Vacuuming Schedule:
Vacuum once or twice a week to remove dirt and debris without damaging repaired areas. Avoid high-power vacuum settings near delicate fixes.
Professional Cleaning Frequency:
Schedule professional carpet cleaning at least once a year to maintain overall carpet integrity and prevent wear around the repaired spot.
Periodic Inspection Routine:
Check the repaired area and surrounding carpet every few months for signs of wear, lifting, or damage. Promptly touch up minor issues before they worsen.
Touch-Up Procedures:
For patches or transplanted fibers, keep extra adhesive and matching fibers on hand for quick fixes if the repaired area begins to degrade over time.
Conclusion
Carpet burns don’t have to lead to costly replacements. By assessing damage accurately, exploring repair methods like surface cleaning, patching, or fiber transplantation, and knowing when to call professionals for advanced fixes, anyone can restore their flooring effectively.
The cost-benefit analysis shows that DIY repairs can save homeowners hundreds of dollars while still producing excellent results when done correctly. Always weigh your options and analyze the extent of the damage before choosing between repair or replacement.
Remember, with the right tools and techniques, you can confidently tackle carpet burns on your own. Let us know in the comments if you’ve tried any of these methods or have questions about repairing your carpet!
For further read: Click
FAQs
How long do carpet burn repairs last?
Most repairs, if completed properly, can last for several years and blend seamlessly into the carpet.
Can all carpet types be repaired?
Yes, but results may vary depending on the carpet material, pile height, and extent of damage.
Will insurance cover carpet burn damage?
Some insurance policies may cover accidental damage, especially in rented or insured properties. Check with your provider for details.
How to match carpet colors perfectly?
For best results, use remnants from the original installation or contact manufacturers for matching material. Professionals may also offer custom dyeing options.
1 thought on “How to Fix Carpet Burns: 4 Proven Methods to Restore Your Flooring (2025 Guide)”