
Replacing carpet with hardwood flooring is not only a great way to upgrade your home’s aesthetic appeal, but it also increases its value and provides a more durable and hypoallergenic environment.
Before you dive into this home improvement project, it’s vital to understand the process, budget, skills needed, and the time it requires. This guide will walk you through each step of replacing your carpet with hardwood flooring, ensuring you’re well-prepared for this rewarding transformation.
Hardwood flooring boasts numerous advantages over carpets. Its timeless elegance infuses your home with a warm and inviting ambiance, and it can be seamlessly integrated with various décors.
Hardwood is incredibly durable, outlasting carpets for many years and providing a great return on investment. It is also easier to clean and maintain – a simple sweep or mop keeps it looking pristine.
For allergy sufferers, hardwood offers a hypoallergenic option as it doesn’t harbor allergens like carpets do. Plus, any scratches or damage can easily be repaired by sanding and refinishing, a feature not available with carpets.
Materials Needed
To successfully replace carpet with hardwood flooring, you’ll require the following tools and materials:
Hardwood Flooring: Choose the type and shade that best suits your home’s aesthetic. Remember, the amount of flooring needed should be more than the area of the room, to account for any errors or damaged pieces.
Flooring Nails or Staples: These will secure your hardwood flooring to the subfloor. Ensure they’re suitable for your chosen type of wood.
Pry Bar & Pliers: These are for removing the existing carpet, padding, and tack strips.
Flooring Nailer or Stapler: A specialized tool to fasten the flooring to the subfloor.
Miter Saw & Table Saw: For cutting the hardwood planks to the correct length and width.
Tape Measure & Chalk Line: To ensure accurate measurements and straight lines.
Hammer & Nail Set: These will be used to secure the last few boards, which are usually too close to the wall to be nailed with the flooring nailer.
Ear Protection, Safety Glasses, and Knee Pads: Essential for personal safety while working.
Level: To ensure the floor is completely even before starting.
Underlayment: This provides a clean, smooth surface and also offers noise reduction and insulation.
Removal of Old Carpet
Safely Removing the Old Carpet
Before starting, put on your safety glasses and work gloves to protect yourself from potential dust and sharp objects.
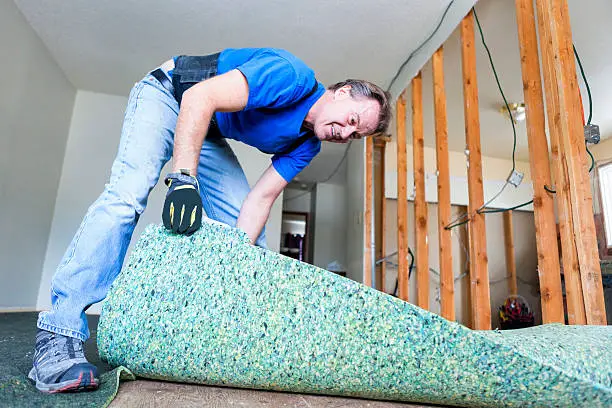
Start at a corner of the room, and using your pry bar and pliers, carefully pull up the carpet. Once you’ve loosened a portion, you should be able to pull the rest by hand. Proceed to do this until the entire carpet is removed.
Next, remove the carpet pad underneath in a similar manner. Remember, the padding might be stapled, so be cautious while removing it.
After the carpet and padding are removed, you’ll find a layer of tack strips around the perimeter of the room. These thin wooden strips have sharp tacks pointing upwards to hold the carpet in place. Very carefully, use your pry bar to remove these strips.
Inspect the subfloor for any staples or nails that were used to secure the carpet and padding, and remove them with pliers.
Disposal of Old Carpet
Disposed carpet can take up a lot of space in your trash bin, so it’s best to cut the carpet and padding into smaller, manageable strips for disposal. Always check local landfill or waste disposal regulations because carpets may need to be disposed of in a specific manner or at designated locations.
Consider recycling options; many recycling companies accept old carpets. If the carpet is still in good condition, consider donating it to local charities or organizations.
Preparation of Subfloor
Cleaning and Prepping the Subfloor
After the removal of the old carpet and padding, your next task is to thoroughly clean the subfloor. Sweep or vacuum the entire surface to remove all dust, debris, and any leftover carpet staples or nails.
For a deeper clean, use a damp mop with a mild detergent to ensure the floor is free of grime or any residue. Allow the subfloor to dry completely before proceeding.
Leveling the Subfloor
Inspect the subfloor for any uneven areas or defects. A straightforward way to check for levelness is by using a long, straight 2×4 and a carpenter’s level. Place the 2×4 on various spots on the floor, and put the level on top. If you find any humps or dips, they need to be addressed before the hardwood can be installed.
For high spots, sanding or grinding can be effective. For low spots, use a self-leveling compound. Follow the instructions on the compound packaging for best results.
Once the compound has been spread and is level, allow it to dry completely according to the manufacturer’s instructions before proceeding to the installation of the hardwood floor.
Installation of Hardwood Flooring
Step 1: Choosing Your Hardwood
The first step is to select the type of hardwood flooring that best suits your aesthetic preferences and practical needs. There are two main types: solid hardwood and engineered hardwood.
Solid hardwood is made from a single piece of wood, while engineered hardwood consists of a real hardwood veneer atop a layer of plywood. Keep in mind factors such as room usage, foot traffic, and relative humidity in your home when making your decision.
Step 2: Acclimation
Once you’ve selected your hardwood, it’s crucial to let it acclimate to the room it will be installed in.
This process helps prevent the wood from expanding or contracting after installation. Leave the unopened packages in the room for at least 48 hours before installation.
Step 3: Layout
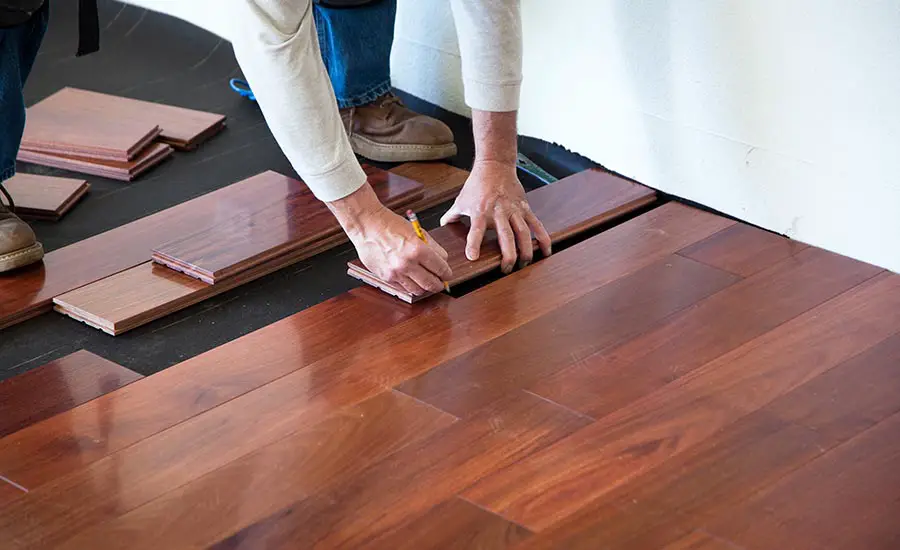
Before you begin installing the hardwood, plan your layout. The planks should be installed perpendicular to the floor joists for maximum stability. Also, consider the aesthetic factor; running the planks parallel to the longest wall generally makes the room appear larger.
Step 4: Starting Row
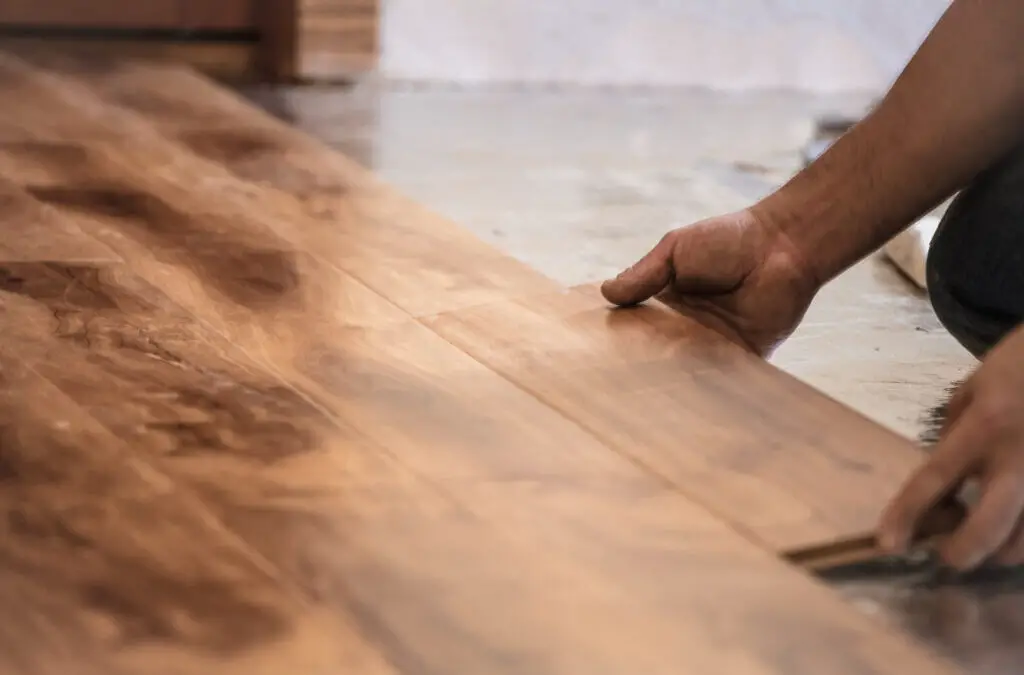
When you’re ready to start installing, begin with the longest, straightest wall, typically an exterior wall. Place spacers along the wall to maintain an expansion gap, which allows the hardwood to naturally expand and contract with changes in temperature and humidity.
Step 5: Installation
Apply a bead of adhesive to the groove of the first row of planks, or, for a floating floor, apply it to the tongue. Press the plank into place, ensuring it is aligned correctly.
Continue this process for the remaining planks, making sure to stagger the joints between planks to enhance stability and aesthetic appeal.
Step 6: Finishing Touches
Once all the planks are installed, remove the spacers. Fill the expansion gap with matching molding to hide the gap and give your room a polished look. Install transition strips at doorways and around kitchen islands to provide a smooth transition between different flooring types.
Step 7: Care and Maintenance
After installation, proper care is essential to maintain the beauty and longevity of your hardwood floor. Regularly sweep or vacuum your floor to remove dirt and debris, and use a damp mop and a cleaner specifically designed for hardwood to handle bigger messes.
Avoid using excessive water or steam cleaners, as these can damage the wood.
Step 8: Managing Tricky Areas
Managing corners and doorways when installing hardwood flooring can be challenging, but with the right approach, you can achieve a professional-looking finish.
Corners: For inside corners, measure and cut the plank to fit the space, allowing for an expansion gap. For outside corners, use a coping saw to cut the contour of the plank, ensuring a tight fit.
Doorways: When tackling doorways, you’ll need to trim the bottom of the door casing so the new flooring can slide underneath. Lay a piece of your flooring down and a piece of underlayment next to it.
Then use a handsaw, lay it flat on top of the flooring, and cut. Remember to account for the doorway transition strip when cutting your planks.
Related Topics:
Finishing Touches
Step 9: Applying Sealant or Finish
Applying a sealant or finish is an essential step in hardwood floor installation. It not only enhances the appearance of the wood but also provides an extra layer of protection.
Start this process by ensuring that your floor is clean and free of dust or debris. Then, select a sealant or finish that is right for your specific type of wood. Apply the product evenly using a high-quality brush or roller and always follow the manufacturer’s instructions regarding drying time and the number of coats.
Be patient and allow each coat to dry thoroughly before applying the next.
Step 10: Reinstalling Baseboards or Trim
Once the sealant or finish is completely dry, it’s time to reinstall the baseboards or trim. If you remove these pieces carefully during the preparation stage, they should slide back into place easily. Use a nail gun or hammer and finishing nails to secure them back onto the wall.
Remember not to nail into the hardwood floor as you risk damaging it. Once the baseboards are installed, fill in any nail holes with wood filler that matches your trim color.
After the filler has dried, lightly sand the area and wipe away any dust before painting over the filler to blend it in with the trim. At this point, your hardwood floor installation is complete. Take a step back and admire your hard work.
Conclusion
Replacing carpet with hardwood flooring is a rewarding project that can significantly enhance the aesthetic appeal of your home, bolster its value, and create a healthier living environment. This comprehensive guide has walked you through the process from start to finish, demystifying each step in detail.
It’s a project that requires careful planning, budgeting, and an understanding of the skills needed to ensure successful completion.
Though it might seem daunting, patience and perseverance will pay off when you see the transformation. The durability and timeless charm of hardwood flooring far surpass that of carpet, making it a worthy addition to any home.
FAQs
Can I install hardwood flooring over the existing carpet?
No, it’s not recommended to install hardwood flooring over existing carpet. Carpet and padding will not provide the firm, solid base that hardwood flooring requires. Before starting your hardwood flooring project, you should remove all carpet, padding, and tack strips to ensure a smooth, clean surface.
How long does it typically take to replace carpet with hardwood flooring?
The duration of this project can vary depending on the size of the room and your experience with DIY projects. For an average-sized room, a weekend may be sufficient if you have some experience. However, if you’re new to such projects or if the room is large, it may take several days. Remember, preparation is key and rushing can lead to mistakes.
1 thought on “How To Replace Carpet With Hardwood Flooring”